
This guide is being updated for the April 21, 2026 Forging the Path release, which includes a big revamp to combat and the skill tree. The Ranger and Tank build drafts are complete but will probably have adjustments made to them.
Welcome to the The Complete Written Enshrouded Guide! This is a comprehensive walkthrough of the entire game, including how to survive, progress, defeat the bosses, and unlock all content including the new Veilwater Basin biome.
Color Coding: I tried to streamline the colors in this guide. Green is for information. Light Blue is for resource reference. Red is for important/alert information or enemy definition. Purple is for item reference. Dark Blue is for location tags. Orange is for action references.
Table of Contents
INTRODUCTION
Enshrouded originally entered public test in January of 2024. It’s approaching two years, and the game has evolved amazingly with regular updates that have refined and expanded this amazing unique fantasy sandbox survival game.
The Wake of Water expansion was released on November 10, 2025 and it added a new biome called Veilwater Basin to the game. Most importantly, it added a level of fluid dynamics never seen before in a survival game, which included fishing. The way water looks, moves, and works; and how it can be integrated into base building is unprecedented. It’s truly amazing. On top of that, the expansion raised max level to 45.
On April 21, 2026 the most recent Forging the Path expansion was released. It features a complete overhaul of the combat system and skill tree. With these changes, the game is now more difficult because the balancing also factored in the ability to now upgrade armor, rings, and even tools. As such, players are now expected to upgrade all their gear as they progress; even during the early-leveling process. Weapons received heavy attacks, new special attacks, ranger took a hit, and arrow-based damage was nerfed an estimated 25% – 35%. Enemies now have different states of awareness and dodge more often as well. There were many more enhancements, including the new Adventure Sharing system where players can share and visit each others custom-built worlds. You can read the full patch notes here.
While Enshrouded is a classless game,this guide is going to focus on a Ranger build. I’ve provided the skill point distribution order as a floating panel in the upper right, but also listed below for those who want to just follow the skill point distribution list. But you can play any build you’d prefer.
Note that melee is very strong in this game, and in some ways easier because once you get life leech, you’re pretty much unkillable. And when you get grapple, you can pull those pesky flying enemies to you with ease. I’ve included a Warrior build variant at the bottom of this guide for those who want to follow that.
While Mage is powerful at endgame, it’s terrible while leveling. Even with the latest expansion, it’s still bad. I wouldn’t recommend it. Most experienced players will level with melee when building a mage and then switch over to a mage build around level 20.
Efficiency of this guide
Enshrouded is a very large sandbox game. Experienced players can skip many quests, take on monsters much higher level than their character, and approach the game differently than the order that’s presented herein. Having said that, this guide isn’t the most efficient way to play the game. It’s designed for new or returning players to (re)learn the game, mechanics, and have a guide will take you from the start all the way to killing the final boss while having the best armor and weapon currently available for this build. There’s a ton of quests I skip, and places I don’t go. But that’s alright because even after the final boss is killed, there’s still plenty of things to do. If you have recommendations on changes or enhancements, let me know in the comments.
Recommended Difficulty Settings
It all really comes down to fun factor. Most of my initial playthroughs were on Default settings, but now I prefer setting Loot Loss On Death to Keep All. The reality is people who play Enshrouded die. A lot. And many of the deaths will be questionable relative to simple misclicks or misjumps. Corpse runs just aren’t fun, and those who want to play hardcore engage with the game in a completely different and more cautious way. I also think Disabling Curses makes the game more enjoyable.
Building a world for multiple characters
While this guide focuses on playing through on a single Ranger character, I want to note you can bring another character into this world any time you want. This means you can farm gear for other builds. Wands for wizards, axes and sword for melee, etc. While I find it’s more enjoyable to play through a new world with each character, there are no level requirements for equipping gear. So you could get endgame top tier weapons for another build, create that character, and bring them into the world to quickly outfit with amazing gear. It’s actually lot of fun – and that new character will still have to complete all the quests and explore the world on their own. They’ll just be decked out in great gear.
Recommended Map for Reference
Having an external map you can reference for looking up the locations of quests, points of interest, roots, and other important destinations is a very good thing. Especially given the scale of the world. We have two maps at our disposal. The first is Mapgenie at: https://mapgenie.io/enshrouded/maps/embervale. The second is the Wiki map at: https://enshrouded.wiki.gg/wiki/Map. Use whichever one has the style you prefer.
Best Bows
When you’re leveling, the best bow is generally the one that gives you the biggest damage increase. However, the draw speed is critical. The difference between a 0.6s vs a 1s bow is quite staggering, allowing you to land two shots in nearly the same time as you would land one.
For endgame, the two best bows for single target are: Forsaken and Avalanche Starter. You can also find a Composite bow that drops early game, but the Avalanche Starter doesn’t begin to drop until the final biome. But a Forsaken bow is incredible. In the end, you’ll use the best items you find as they drop. The Fell Commander Bow also drops early on (which this guide covers), and it’s a fantastic weapon. For explosive arrows, I find the best bow to be the Ignited Bow.
But what Gem do we want to socket? The general consensus seems to be Gem of Puncturing is the “jack of all trades” for a bow. However if you find a Legendary Ignited Bow, a Gem of Burning could be preferable.
The reality is most targets die in just a few shots; long before any DoT does any real damage. And most boss fights have you at a distance, so the Gem of Focused Light doesn’t work because of its short range. Plus the Gem of Puncturing drops very early game (in the Springlands from the Scavenger Berserker). Later on you’ll switch to the Gem of Lycanthropy, which is pretty amazing.
Gem Hunting
Gems start to drop around level 10, and while they can be useful and help with the leveling process, they aren’t ultimately game-changing. You can socket whatever gems fit your play style the best. As covered herein for the Ranger build, the Gem of Puncturing is recommended for your bows. But for those of you who want to try different builds, the below video and link included in the description is the best and most current gem overview and farm location reference I’ve found.
Not jumping for joy?
My first few playthroughs of Enshrouded, I took and used Double Jump at the beginning. I thought it definitely helped until I played through without it and realized I could get everywhere and do anything I needed to complete quests without it. Sure, there were a few areas where double jump would have made things easier, but the reality is I found using those skill points early and mid-game for damage and healing made a bigger difference, so I decided to take double jump later on. But if you’re encountering issues navigating puzzles, slopes and getting to specific locations, you can take the skill whenever you’d like.
PART I – STARTING OUT
We’ll build our starting base, gather resources, and establish a foothold for everything to come.
Phase I – Creating your Base
I like to map my dodge to my side mouse button. To do this, open the menu, go to Settings > Keyboard & Mouse Bindings > Select Evade and click the right column then the mouse button you want to use.
Create your Character. Select Private. Create a New Game. Use default settings and name the world. If you don’t want to deal with Weapon Durability, you can click on Detailed difficulty settings, scroll down to Survival and toggle Weapon Durability off. When the world is created, click PLAY!
- Exit the chamber. Commune with the Flame.
- Go outside. Read the paper next to the skeleton. Punch the Skeleton to get a bone.
- Follow the path into the mine. Open the Chest. Get the Torch and Bandage.
- Enter the mine. Follow the path down. Grab the Sword. Equip it by hitting the associated number in your hotbar.
- Keep going down into the shroud. Kill the first mob and loot it.
- Continue. Kill the other two mobs. Test your dodge skill out. Get a feel for it. Loot the bodies.
- Use the Explosives to exit the mine.
- Grab every bush you can by pressing E as you run up and through them. Plant Fiber, Twigs, Stone, Mushrooms, and Berries. Get everything you see while following the main path. Loot the Beehives to get Honey and Wax.
- If you encounter a Swarm of Bees, just run away from it. Don’t try to fight them. It’s not worth it.
- Enter the Shroud area on your right. Kill the mobs. Easy to do and not get hit. Swing twice, then dodge left or right. Attack again. Go down the stairs in the shroud area. Kill the 2 mobs. Swing sword to break through door. Open chest.
- Note that each chest drop is RANDOM so you may get a better weapon or nothing good at all.
- Use sword to destroy boxes and loot everything before you go back up.
- If you need to heal, press V. If a Bandage isn’t available, craft a String, then craft a bandage. It will appear in your hotbar. Press the number and use the bandage to heal. You can also eat a berry to regenerate for 30 seconds.
- Get back on the path and run to the red-marked field where we’ll set up our base.
- Run around and grab all the Stone, Twigs and Plant Fiber you can around the clearing. If you see a wolf, kill it. Only grab the twigs around the clearing; don’t wander too far. Pick up any Mushrooms and Beehives, which drop Wax and Honey.
- Press V and craft 8 String. Now craft: Tiny Backpack, Pickaxe, Axe, and Bow. This will unlock Wood Arrows. Craft just 10 of those.
- Equip the Tiny Backback to expand your inventory.
- Time to set up the start of our action bar. Press B and put the Bow in Slot 1 and the Sword in Slot 2. We use the Current Action Bar for weapons. We use the ALT Switch for crafting/farming. Drag the pickaxe into the ALT switch 2nd row 3rd column, and the axe into the 4th column.
- Craft a Flame Altar. Get Stone if you don’t have it.
- The game put the Flame Altar in Slot 1 of your action bar ALT Switch. Press Alt and then 1. Place the Flame Altar in the middle of the field. Notice the yellow outline. That’s your starting build radius.
- Commune with Flame.
- Press V and build a Workbench. Place it next to the Altar. Use it to repair your gear.
- Press J and select Quests. We have our first quest! Press F to show it on the map.
- Left click on Find the Sleeping Survivor and select Set as Waypoint. Press ESC.
- Before we head out, we’re going to run Southwest into the old town beyond the pointed wooden fencing. Use your sword and destroy the wrapped boxes by the wagons. Press ALT to switch back to the other action bar so you can use your sword. You’ll get Torn Cloth, String, etc.
- Pull the arrows out of the arrow targets. Run to the well. Use it.
- If you don’t have a Water Flask, you can craft it at the V menu.
- The Wake of Water expansion changed how we fill Water Flasks at Wells and at Bodies of Water. To do this, put the Water Flask in your action bar and use the mouse wheel to cycle through your slotted items to highlight the flask. When selected, the option to hold your right mouse button down to fill the flask will appear at wells and in water.
- Run to the red glowing book. Read it. Pick up the food. Press B. On your current Action Bar, move the Cooked Meat, any Berries you have and water to the 6,7,8 slots. Use all 3. You can discard the cooked mushroom (right-click Delete). If you don’t have at least one bandage, craft one. Put it in slot 5.
- Press V and craft Basic Armor – Chest, Pants and Boots. Craft more string if you need to.
- Press B and equip the armor. Right-click the Threadbare Pants and DELETE them.
- Run back toward your base, grabbing every bush you pass with E and cut down one tree. To do this press ALT and then 3. Hack away! When done, craft the shield. Open your backpack and right-click equip the shield. You’re ready for action!
- To use the shield, right-click to block. If you block right when an enemy attacks, it’s a parry – which stuns them!
- Now is an important time to mention right-click aiming with your bow. Not only does it manually aim, but if you move your mouse wheel while holding the right-mouse down, it’ll cycle through the different types of arrows you have. This is how we can change arrows during combat without having to put them in our hotbar!
Phase II – Getting the Blacksmith
- You’ll notice the compass at the top now has a waypoint on it. Time to head out! Make sure you use the workbench to repair your sword. Follow the waypoint to the northwest.
- Grab all the bushes, stone and mushrooms you can on the way to the stone bridge.
- You’ll see tents to the right. Go into them. Read the book. Open the chest.
- Head down the trail. Read the page. Climb up and open the 2nd chest.
- Venture down into the mist!
- Cut down the two dead shroud trees on your right with your axe. Pick up the shroud wood.
- Follow the trail until you get to a crossroads. You’ll see a glowing read object ahead on the left. Kill the single monster first. Use the glowing Restore Time Cylinder so you know what it does. Head WEST at the crossroads. It’ll go upwards. Stay on the path.
- You’ll exit the shroud and come across Rookmoore.
- You should have 2 skill points to distribute.
- Eat some berries or use a bandage to restore your health.
- Let’s clear things out! Move on in. Remember to use your dodge. Hit the target twice, dodge left or right. That should avoid most hits from the monsters.
- Use the well after the 2 monsters are dead to get 5 water.
- Shoot the red explosive boxes with your bow (1) and gather the parts. To manually aim your bow, select it and hold down the right mouse button and left click when the circle is complete. You can also use your mouse wheel while in right-click manual aim to change ammunition.
- Read any books. Loot EVERYTHING.
- To open the silver chest that’s locked, press V and make a lockpick from a metal scrap.
- When you read A Cold Reception, it’ll mark your map. Note this is just a lore item and doesn’t provide any reward and isn’t a quest. You can look at it in your journal.
- This is where you’ll start getting a feel for melee combat. Dodge. Attack from behind. Avoid their attacks. Use berries to regenerate health or a bandage. You’ll probably also notice your weapon durability is pretty low. The good news is a repair anvil is in the tunnels below the town. It looks like this.

- Once the village is cleared out, go back to the entrance and follow that little path outside on the left that heads northeast up the mountain. Don’t follow the path that wraps around the town you just liberated. Look around for the one that goes upwards.
- Stay on the path. If it’s night, you might encounter wandering mobs. Kill them if you do.
- When you arrive outside of your destination, kill the mobs, read the book, and loot everything. There’s two books. One is on the 2nd level up a ladder. Remember to destroy and loot any storage containers.
- Enter the Ancient Vault – Blacksmith. Kill the mob, read the book, approach the glowing pod and liberate your first survivor!
- Press M and left click on your HOME Level 1 base Flame and Fast Travel back!
- Commune with the Flame.
- Press V and build a Summoning Staff and Construction Hammer. Put the staff in ALT slot 1 and the hammer in ALT slot 2.
- Select the Summoning Staff and press TAB. Left click and place your Blacksmith!
- Commune with the Altar and then the Blacksmith to get his quests.
- Open your inventory and see if there’s any weapons in there. If so, right click and SALVAGE to get the runes.
- Select the craft option from the Blacksmith. You’ll see he has a Forge and Charcoal Kiln. Don’t make those yet. Select the ARMOR category. The Fur Armor Set is what we want first. We’ll need:
- 8 Torn Cloth
- 7 Animal Fur
- 9 String
- 5 Metal Scraps
- You should have everything, but might need to craft the string.
- If you’re missing the Animal Fur you can go and shoot the poor goats.
- Just DELETE the old armor. Once you’ve equipped the new armor, press N to see your character stats. Your Physical and Magical resistance should be 58.
- Take the Shelter and Glider quests from the Blacksmith.
Phase III – Creating your Base
- It’s time to build the core of our new base and do some farming! First we’re going to mine 130 Stone. Make sure you drink water and are rested. You can get your rest bonus by sitting next to your base flame. To do this press and hold down X and move your mouse down to sit.
- You can use your pickaxe on rocks or go northeast right beyond the tree line and start picking the rocky ground. Make sure you have water active since it’ll help with stamina.
- Remember to grab each and every bush your run by!
- When you have the stone, go back to your base and use the workbench. Create 63×100 stone blocks.
- Now use the Construction Hammer. Press TAB to enter the build menu. It’s actually very easy to use. Hold down ALT and select the 4M blocks and the 1st one. You can use the mouse wheel to navigate left to right. Note you can stack a stock block on TOP of a level one to clear any terrain that’s in the way. RIGHT CLICK to delete a block (or any other item) and have the materials restored.
- Start with a 5×5 stone floor with 4 pillars around the edges.
- Next you’ll need to create 36×50 Roof Blocks. You’ll need 180 Plant Fiber to do this, so you’ll probably need to run out and get more.
- While on the build menu, hold down ALT and use the mouse wheel to move to 4M Roofs. I place the corners first. Then I do the sides, using R to rotate. To get the roof area, you’ll need to build stone stairs so you can run up on the roof and place the 9 flat roof parts.
- The reason we do this and don’t just make flat roof parts is because the edges will be too open. We need the sloped edge pieces to have more comfort space inside. You can delete the stone stairs because you won’t be using them again.
- When you’re done, it’ll look like this:

- Go to the workbench and make a bed. Place it in the corner somewhere; you’ll be adding 8 more beds as you get the additional survivors. Don’t put it too close to the edge, or he’ll complain it’s exposed to the elements. Deal with our wall-less house!
- Then use the Summoning Staff on the bed to assign the Blacksmith to it.
- Now that he has a bed, you can talk to the blacksmith and craft the Scrappy Pickaxe and Scrappy Axe.
- Put those in your #3 and #4 slots on your ALT bar and DELETE the old level 1 axe and pick.
- You should have some raw meat on you. Go to your Workbench and craft a Fireplace. I put mine on the edge of my base in the corner. Put the meat in one of your unused action slots, and cook the meat.
- Our food should be: Water + Cooked Meat + Berries (only to regen health).
- Craft a Tiny Chest at the Workbench hand put it next to the flame (I use X for snapping). Note this is temporary. We’ll break it down later. For now, toss in animal fur, twigs, runes, stone, metal scrap, shroud spores, etc.
- Note the Small Magic Chest. We want to only use Magic Chests whenever we can because they are automatically pulled from for crafting. Each chest requires:
- 15 Shroud Spores
- 15 Active Mycelium
- Shroud Spores are acquired by killing and looting the shroud mobs. The Active Mycelium is farmed. We’ll be doing that shortly.
- We also want to gather the materials to make the Glider and Grappling Hook, which requires:
- 8 Shroud Wood
- 2 Animal Fur
- 9 String
- 12 Shroud Spores
- 4 Metal Scraps
- Let’s go get those spores!
- Make sure you have at least 3 bandages and everything is repaired.
Phase IV – Clearing the Shroud Well
This is your first tough mission, and time is important because we’ll be in the shroud.
- Your active quest should be Clear the Elixir Well.
- Head back into the Shroud where we went before. Except this time, at the crossroads, we’re going RIGHT (east). Drink water, eat the food and berries.
- Follow the path as it moves downward.
- Cut down the glowing tree things with your CHOPPING AXE (not sword) to get Activated Mycelium (any amount). With these you have to pick it up off the ground.
- Cut down TWO dead shroud trees and pick up at least 10 Shroud Wood.
- Grab some of those bubbly mushroom things to get at least 5 Shroud Liquid.
- Go to the RIGHT when the path branches. It can be a bit confusing as there’s two paths. Take the one that leads you to the well by looking at the map.
- When you get there, Read the book.
- Let the archers run away and when they turn to shoot, rush and attack them. If you keep chasing them they’ll just run.
- Watch out for the guy with the mace. He hits like a truck. Dodge and take care of things.
- By the time you’ve killed the mobs, your time is probably very low. Run toward the big arches and up the stairs. Note all the white glowing stuff is Activated Mycelium that can be mined.
- Go to the orange glowing Resurrection Beacon and you’ll notice your time recovers. These are at the top of every Shroud Well.
- Make sure you have food up and bandages ready to go… now descend into the well!
- Up ahead is a mini-boss and a red glowing root. Kill the mini-boss. Strike, dodge left and right, and avoid his big hard hit (which can 1-shot you). If you take too much damage, use your berries and bandages.
- When he dies, loot his goodies. You generally either get a Tainted Axe, which is an awesome 1H axe or a Guillotine, which is a slapping 2H axe.
- Switch to your CHOPPING AXE and chop that root down!
- Liberating a Shroud Well awards 3 skill points. Assign them per the listed order.
- Note once we removed the root, we’re no longer enshrouded!
- Climb back up. You’ll see the Silver Chest. Check for juicy loot.
- When you get to the top, time to mine 30 Activated Mycelium from the glowing trenches with your Pickaxe.
- Kill the rest of the mobs guarding the well outside. We need 12 Shroud Spores. If you kill everything around the Well and still don’t have 12, just wander around a bit to pick off the wandering mobs. Going back up toward your base is a good direction.
- When everything is dead, teleport back to your base.
Phase V – Upgrading your Base
- Talk to the Blacksmith. Get the new quests.
- Put the weapon that dropped as your #2 action bar and clear out (salvage) any extra gear.
- Craft the Glider and Grappling Hook. Equip both.
- Go to your Altar and Upgrade it with the Shroud Core.
- We don’t have enough Shroud Spores to craft a magic chest yet.
- Craft 5 more bandages just to have them ready.
- Put the Twigs, Wax, Spores and anything else you don’t want to carry in the storage chest. Delete things like Fireflies, Fur Patch and Books. Keep the rest. If you found a wand, extra sword or any other blue weapon you won’t use, salvage it for runes. You probably have 20-30 Scrap Arrows and a handful of Flint Arrows. Delete the Flint Arrows for now along with the Wooden Arrows. If delete isn’t selectable, just equip the Scrap Arrows. The game won’t let you delete something that’s equipped.
- We aren’t going to upgrade our axe. No need because we’ll replace it soon. Keep your Runes.
- Our next goal is to Strengthen the Flame of our Altar and build our first Magic chest. We’ll need:
- 5 Resin
- 5 Penny Bun
- 5 Bones
- 5 Shroud Liquid
- 1 Spark
- 5 Animal Fur
- We haven’t farmed Resin yet, and if you don’t have the Animal Fur or Bones just get those by killing wolves or using your bow to shoot goats you see.
- Press M and left-click the ? to the west of you Flame and Altar Base Improvements. Set as Waypoint.
- Make sure you’re rested, have food, drink, and berries. You can run into the nearby town and hit the well again for 5 more water.
- Head due west from your base through the woods just outside the town ruins.
- Pick up all the mushrooms and bushes you see along the way.
- You’ll see multi-colored Flint in the cliffside up ahead. That’s where you’re going. If you want, bring up your map and mark the location of the Flint with whatever icon works best for you. Granted it’s close and you know where it is, this will be your first marker.
- Use your Grappling Hook to go up and over the wooden structures. Climb the wall to get to the very top.
- Once you reach the top, approach the house. Use your bow to shoot the exploding barrels.
- Kill the wolf and the bad guy. The barrels should have revealed a silver chest. Loot it.
- Use your grapple to get to the top, your axe to break down the door and read the paper. Loot whatever you can.
- Leave and take the path to the SOUTHWEST (Left).
- Kill everything at the Scavenger Camp and loot it.
- There’s a big dirt blocked mine shaft. Shoot the explosives. Read the letter and loot the chest. If you get a better bow, replace yours. Note the core bow can’t be salvaged, only deleted.
- Leave the camp and follow the road SW.
- A note about Resin. Red trees have excessive Resin. If you see any, go and cut them down and gather at least 5 Resin. You might get it, you might not. If not, it’s fine, we can get it back at base. And if it’s dark, it’s hard to see.
- If it’s night out beware of patrolling scavenger groups. You can shoot the ranged guy or the glowing dog from a distance to pull them from the group. As for the melee, i f you’re good at dodging and have bandages, you can take them out. We’re still not a pure ranged build yet, so we’ll be using our axe to dispatch most foes.
- If you die, you’ll revive at your base and have to run back and pick up your gravestone. There is no death penalty in Enshrouded other than having to do a corpse run, so don’t worry about dying. This game takes time to learn and can be tough for new players.
- Continue down the road following the waypoint marker on our compass. When the road branches, go LEFT (northwest). Bring up your map to get your bearings to make sure you’re heading in the right direction.
- If at any time you run out of arrows, you can craft wooden arrows with the twigs you’ve been looting from the bushes.
- The path will lead up to a cave. Within this cave is a Shroud Root, but the level of the shroud is too high for you (which is why the mist is red). Don’t go near it or you’ll die. Instead, follow the little path off the main one outside of the cave that heads up and west.
- You’ll arrive at the Flame Sanctum. Shoot the bats with your bow. Go inside. Read the note. Get the spark and teleport back to your base.
- Repair everything. It’s a good habit to use your Workbench every time you teleport back home.
- If you don’t have 5 Resin, run around your base and look for red trees. If there aren’t any, just start cutting the trees down. The bigger trees have a better chance of dropping Resin. We’ll need the wood anyway.
- Strengthen your Flame to Level 2 and commune with it.
- You probably made a level while we were out adventuring. Spend those points!
Congratulations! You’ve finished Part I! We’re now up and running with our first survivor, a small base that’ll quickly become bustling with activity, and our skills set to where we can start doing some actual damage with our bow.
PART II – Springvale and Lower Meadowlands
Time to really start getting into the game! We’re going to explore Springvale, find the Carpenter, Hunter and Alchemist. I also want to mention the importance of having an extra Flame Altar and Workbench in your inventory. The reason? So you can conduct field repairs, and also establish a fast travel point if you need to quickly run back to your base for any reason. Ulti
PHASE I – Getting Ready
- You might have the 4 Dried Fur to craft a Small Backpack. If you do, make it and use it to expand your character’s inventory. If not, don’t worry.
- Make sure you have at least 5 bandages and water. Put items like the Fell head, Mycelium, Shroud Spores, etc. in your Storage Chest.
- Cook any meat you have and make sure you always have at least 5 meat, water, and 10 berries on you.
- Go to the Blacksmith and craft 5 lockpicks.
- Drink some water. Run out and gather 55 stone, 200 springlands dirt (not fertile) and 200 wood logs. Make sure you dig outside of the yellow border of your base so the terrain resets.
- Run back and make 1300 stone building blocks.
- Build a 1×5 stone patio outside of your base.
- Go to the Blacksmith and build 2 Charcoal Kilns. Place them on the outside ledge facing inward (use R to rotate and X to snap).
- Select the Charcoal recipe for both of them.
- Open your inventory and split the Wood Logs and Springlands Dirt by moving your mouse over them and holding CTRL while scrolling your mousewheel down once.
- Put half of the logs and dirt in one kiln, and the other half in the other.
- Charcoal is a critical ingredient for making many things, so you want to make sure the kilns are always going and producing.
- Time to improve our comfort. You’ll need 12 Wood Logs and 1 Resin. Go to the workbench and craft: Standing Torch, Crude Wooden Side Table, Crude Wooden Stool, and Crude Bench. Place them together off in the corner. With the fireplace, your comfort should now be 7 which is 13 minutes. We’ll be increasing that soon.
PHASE II – Securing the Spire
- Make sure your weapons are repaired, you have food, water and berries, and at least 5 bandages and 5 lockpicks! You can rest in bed to heal your health.
- Bring up your map and mark the Ancient Spire as your waypoint.
- Head toward Braelyn Bridge. Pick up all twigs as you run there.
- Drink water and eat food. Cross Braelyn Bridge using your Grappling Hook.
- Cross the bridge and head to the spire (follow the path north).
- Grab all the bushes/twigs you can as you run to the spire.
- Use Grappling Hook at Blocked Road.
- Read the book and open the chest under the blocked road on the other side.
- Follow the path North and it’ll wrap up and around.
- You’ll see a glowing book off the path on the right. Read it and loot the body.
- If it’s night, you might see Midnight Lily for the first time, a glowing blue plant. Grab it! It’ll replace our berries and gives us passive health regeneration.
- Go back to the path and run up and enter the spire.
- Step on the purple teleporter and use it.
- Spires have 3 levels and multiple chests. The puzzles are button puzzles to unlock doors to proceed to the next area. They’re actually quite simple once you get them down. Some buttons need to be pressed. Others need to be shot with arrows, so if you can’t find a button, it’s probably up against a wall and needs to be shot. Traps are simple dodge mechanics, and you will often have to use your grappling hook to swing and climbing area to traverse up walls. Make sure you have enough stamina to climb before you start!
- Remember, you have a glider now! So you can jump off the top of a spire and hit space to glide!
- Once you reach the top, you commune with the flame and unlock the spire. You can now teleport here anytime.
- You MIGHT have found a weapon upgrade in one of the chests. If so, slot the weapon (if it’s a bow, equip it). Salvage anything you don’t need.
- Teleport back to your base and Commune with the Flame. This unlocks the quest to get the Hunter!
PHASE III – Getting the Hunter
Time to get our sugar mamma of arrow and armor goodness!
- Bring up your journal and select Hunter Becomes the Hunted quest. Set it active and show on map.
- If the Blacksmith has quests, take them.
- Enhance your bow or axe just once to complete the quest. This can be done through the Blacksmith.
- Teleport to the spire. Run to the top EAST ledge.

- Time for us to glide! Make sure you have FULL STAMINA and have drank water.
- Jump off the ledge and hit space again to glide. Head straight for the large structure.
- Make sure you don’t fall into the deep shroud crevasse! Glide over it.
- You’ll pass a Flame Shrine. Grab the spark.
- Don’t need to fight anything on the side – just head straight for the hunter.
- You’ll run past your first pond. We’ll be returning here later to fish!
- When you start fighting, make sure you take out the big furry guys with the large staffs first because they heal.
- Don’t get zapped by the lightning ball trap inside! Use grapple to cross the lava.
- Run inside and liberate the Hunter!
- Teleport back to base.
- Use the summoning rod and summon the hunter. Take her quests.
- Craft her a bed, place it, and assign her to the bed. I recommend setting her roaming range to 0 and resummoning her next to the Blacksmith so she doesn’t wander.
- Craft 100 Scrap Arrows.
- Go to the Hunter and craft the Drying Rack and place it inside your base on the side of the Kilns. Put any extra stacks of Purple Berries you have in the rack.
- Clean your inventory. Scrap any weapons you don’t need. Get rid of any extra dirt or wooden arrows, etc. You can auto-deposit matching item in your storage by opening it and hitting R.
- Grab a stack of Charcoal from a Kiln, go to the Blacksmith and craft the Forge. Put it on the side where you plan on having all your crafting stations.
- We’re going to prepare for crafting our next set of armor. A quick note. We only need to Gloves and Helmet of the Archer set. The Chest, Legs, and Boots will be from the Fighter/Tank set. This gives us the ranged bonuses and also provides good physical resistance.
- To craft our gear, we need:
- 10 String
- 12 Animal Fur
- 3 Bones
- 2 Banshee Gel
- 4 Resin
- 6 Metal Sheets
- 25 Activated Mycelium
- 15 Mycelium
- 5 Shroud Liquid
- The only thing we don’t have is Banshee gel. Everything else is pretty easy to get. The good new is we’re going to liberate a nearby well to get points and that Banshee Gel!
- If you’re low on Metal Scraps just go back to Rookmore and search the broken barrels and destroy everything.
- Go to the Forge and start making 6 Metal Sheets.
- Craft the Big Straw Mat from the Hunter and place it down to increase comfort level by one.
Phase IV – Clearing, Salt, and the Alchemist!
- Make sure you have food and water! Cook if you need, and visit the well if necessary. Rest if your health isn’t max. Make sure you always have at least 5 bandages on you.
- Make sure any Shroud Spores you have are on your character so you know the count. We need at least 15 but 30 is best.
- Bring up your map and mark the purple Elixir Well icon just to the west of the spire as your waypoint.
- Teleport to the spire, and jump off the WEST side and glide down into the shroud.
- You should be using your bow a lot by now. We have plenty of arrows. Always melee the little insects, shoot the archers in the back as they run. Melee is still the strongest when facing a group because you can hit multiple targets. Don’t worry. When we start crafting and using explosive arrows, it’s going to be a BLAST! hahah
- If you’re gliding over a target and just want to go straight down, you can either right-click and free fall (and hit space again before you hit the ground) or use W and S to nose dive and pull up.
- This well has a locked Silver chest over a rickety wood walkway that crosses the lava ground. It’s on the other side of the landing. I often get a legendary weapon from it.
- Below is an image to help with this root. Kill those spawners first. New players don’t realize they need to do that and end up getting zerged by spawned insects and other mobs not sure what happened. Always take out the spawners. A Mace or Axe WEAPON (not crafting, but weapon) is best.

- When you kill everything and destroy the root, don’t forget to open the gold chest! I got a purple bow while writing this. Always open the chests!
- Spend those 3 skill points. By now you should have SKILL SHOT which will now do 30% extra damage if you aim at a target’s head. Note auto-aim doesn’t aim for the head, so to do headshots you need to use RMB aiming.
- Exit the well and kill all the surrounding mobs.
- There’s a big mounds of Activated Mycelium outside the well. Mine 55. Also mine 15 normal Mycelium from the grey mushroom walls to make sure you have it.
- Teleport back to your base. Commune with the flame.
- Go to the Blacksmith. Make 6 Nails.
- Time to build our first Magic Chest. If you have the Shroud Spores to build 2, do it. From this point forward we’re going to only use Magic Chests for the majority of items because all crafting will automatically pull from them.
- This is why we want to kill Shroud Enemies whenever we can. We need the spores to craft the chests.
- If you have it, mark To Mend Old Wounds on your map.
- Teleport to the Spire, and glide westward down to Harvest Homestead.
- You should land in corn fields. Harvest the Corncobs from the good stalks. There’s only a few of them. To the north of the fields, there’s a bunch of trees with Beehives. Grab that juicy Honey and Wax.
- Enter the town of Woodguard. Respawn beacon will activate.
- Read the post outside the church, go in and kill the Undead. Read the lore. Go downstairs. Open tomb and take whatever is inside. Might be a legendary bow!
- When you take whatever is in the tomb, many undead will come at you. Kill them with vengeance! One of the side crypts that opened has the Noble cosmetic outfit. Cosmetic items have the sparkly stars next to it, showing the outfit is visual only.
- Leave the tomb. Note there’s a Silver Chest at the top of the church tower with Stone Shingle Roof Blocks. Use your grapple to go up and get it.
- Open map, mark Unique Equipment: Springlands as waypoint and head on over using the path that leads out of the town to the northwest. Don’t go into the shroud.
- You’ll stumble across a small camp with something in the ground that’s glowing red. Use your pickaxe and pick up the fossil! It’s part of a large collection quest. If you don’t see it, don’t worry.
- Remember to gather twigs and mushrooms as you go toward the waypoint.
- You’ll have to do some parkour jumping up cliffs to get to the Obelisk. When you arrive, read it.
- Time to get our Alchemist! Bring up the map, mark it, and head on over! Easiest way is to climb up and when you see the large building in the distance, jump off the cliff and glide toward it.
- You’ll see a path and the Scavenger Stash cave entrance just Northwest of the Obelisk. Go in, kill everything and open the chest to get the Wailing Blade Sword, a fantastic weapon that glows in the dark and one that you’ll use for awhile. I put it in my #3 slot.

- Resume course to the Alchemist!
- When you get there, remember you can do head shots! Start sniping those bad guys! Many are by explosive barrels. Blow them up!
- Head inside and kill the baddies.
- Awaken the Alchemist.
- Repair your gear at the Anvil.
- Before we head back, we’re going to the Salt Mine. Bring up your map, mark it as a waypoint and head over!
- Before you jump down and into the shroud, as you’re standing on the ledge, look to the east and see the wooden frames. That’s your exit point. Be very cautious about diving into the Shroud from a cliff when you don’t know how to escape.
- Note the mobs below are Level 5 and a bit tougher. Also note if you destroy one of the humanoid spawners, it’ll open a cave with two beholders (flying eyeballs). Careful, their laser beam does a lot of damage. Kill them and loot your first Archaic Essence. It’ll be used later for socketing gems at the forge.
- There’s a silver chest inside the mine on the east side. You can also take the time vial. The salt is actually outside to the right of the entrance. Start mining! Get 200 salt. It’s fast.
- Once you’re done, hug the wall south and get out through the wooden framework and grapple connectors. You’ll see a scroll on your way up. Read it and it’ll start A Buzz in the Walls quest. Mark it and do it. Go back to where you were mining and go inside the mine. You complete it when you get the fossil. Head on out and climb your way out of the shroud! Remember to use your glowing sword when you go in the mine. It lights things up pretty good!
- Once you’re clear of the shroud, teleport back home!
- Go to your magic chest, open it and hold down R to auto-deposit everything or just R to stack deposit. Make this a habit when returning to base. Then go to the workbench and repair.
- Commune with the flame.
- Complete Wailing Blade quest with Blacksmith.
- Summon the Alchemist. Take his quests. Build him a bed and assign him to it. Set his wander to 0 and resummon him next to your blacksmith and hunter.
- Put all your Salt and Animal Fur in the Drying Rack.
- Salvage any gear you won’t use (old bow, daggers, old weapons).
- Make sure you always have 100 arrows on you. If not, craft more at the Hunter.
- If you have less than 30 water, run to town and use the well.
- If you have enough Shroud Spores, craft your 2nd Magic Chest if you haven’t already.
- We’re dropping Bandages (delete them). Now craft 5 Health Potions (normal not plus) at the Alchemist and have them on your main bar.
- Use the Blacksmith to enhance your Wailing Blade twice; stop when it requires legendary runes. You can also use the Hunter to enhance your Bow if it’s a good one.
- There’s a flame shrine to the Southeast of your base. Glide/Run exactly SE until you land near the path then run right under the arch. You’ll see it right to the southeast.
- See the wooden scaffolding sticking out of the shroud to the northeast as you go to the spark? That’s a salt mine and we’ll be using that for future salt runs.
- Get the spark and teleport back to base.
- If you haven’t crafted your Small Backpack yet at the Workstation, you should have enough Dried Fur from the Drying Rack to make and use it. Delete the Tiny Backpack.
Phase V – Root & The Carpenter
Before we get our next companion, remember the Shroud Root on the way to our first flame temple that was too high level for us to do? Time to go do it. The good news is we can glide to it from the Meadowlands spire. As a matter of fact, you can see the misty circular opening against the cliffs when you stand and face on the southwest corner of the spire. That’s where you’re going. You’ll glide halfway and run the other half.

- This is a good time to introduce you to the interactive map because there are roots that aren’t easy to find or obvious. The map will tell you where they all are. Here’s a link. You can click Hide All then only show Elixir Wells and Shroud Roots. This can be helpful when you’re trying to hunt down roots you may have missed before moving to the next area. Remember, each root is a skill point, and each well is 3 skill points.
- There’s another Flame Shrine just to the north of the root in the upper level of crevasse. Run to it and get the spark.
- Always pick up mushrooms since they are key to making healing potions.
- After you get the Spark, teleport back to base.
- Time to get that dwarf-looking wood lover we all know as the Carpenter. Set the waypoint for Ancient Vault – Carpenter. Make sure you are repaired, rested, fed, and have some open inventory. Go to the cliff and glide Eastward into the shroud! Aim for the spires and bridge. Be very careful; do not fall into the red lava chasm. Use the bridge to cross the chasm into Saline Springs. Liberate the town from evil and get those spores. There’s a silver chest and lore book in the building behind a broken door.
- Head east out of Saline Springs, then make a right down the path to the south. See the tall house? There’s a silver chest at ground level behind some wood, and a gold chest up toward the top. Kill the mobs, use your grapple, get the lore book and open the chest.
- Exit, glide down and east towards the covered bridge in the distance.
- When you arrive at the vault, it’s enshrouded. Clear out the baddies outside.
- When you go inside, you’ll come to a ledge above a chamber full of bugs and bug spawners. This area is nasty and kills most new players. Often multiple times. The thing to do? Run straight through and slide down. Prepare your sword/axe because a bunch of bugs will follow. Kill them. Job done. Also note this is a great place to come later on to farm critter parts to make alchemy resources.
- You’ll see the banshees. This is where we get the Aerated Banshee Gel to make our next armor set! Take them out with head shots using your arrows. Make sure you don’t kill them over the lava or you won’t be able to get the loot.
- Follow the path. Climb up. You can either pickaxe through the rubble or blow it with Explosive Powder Balls. 2 do the job.
- Shoot down the banshee in the chamber.
- Awaken the Carpenter!
- Since we’re in the shroud, we can’t teleport. So when we exit the chamber, we’re above the “chamber of bug death”. Jump up and glide down to the top of the mycelium pillar to get out of there and exit the vault.
- Once you’re clear of the vault, teleport back to your base.
- Talk to the Alchemist. Get his quests.
- Summon the Carpenter. Get his quests. Set his wander distance to 0. Resummon and place him with the others. Make him a bed and assign it to him. Take his quests. Take the Blacksmith’s quest.
- Build a Wooden Sink and Decoration Workbench from the Carpenter. Place the sink to increase your comfort and the Workbench to make a bunch of Decorative items, which includes Mannequins. You can load them up with cosmetics and old/other armor sets!
- Open your magic chest(s) and R deposit.
- If you can make another Magic Chest, do it! Toss whatever doesn’t go in the other chests into the new one.
- Craft another 5x Lockpicks. Always have at least 5 on you.
- Time to craft your new armor set! We’ll need:
- 12 String
- 12 Animal Fur
- 3 Bones
- 2 Banshee Gel
- 4 Resin
- 6 Metal Sheets
- 25 Activated Mycelium
- 15 Mycelium
- 5 Shroud Liquid
- You should have everything. Don’t forget to get the Dried Fur and Metal Sheets and put them in your magic chests.
- Go to the Blacksmith. Craft the Rising Fighter Chest, Pants and Boots.
- Go to the Hunter. Craft the Scout Hood and Scout Gloves.
- Now upgrade all of the armor pieces!
- Equip the new armor. Great upgrade! That and your helm and gloves give you 11% Ranged Crit Chance and 2% Ranged damage.
- Let’s put the old armor on display! Go to the Decorative Workbench. You’ll see different Mannequins. Select the pose you like and craft it. Place it and use it. Put your old armor pieces on it. There ya go!
- If you haven’t taken it already, you should be able to get the Ranger skill node that costs 4 points. The next one, Multishot, is one of my favorite and help our build really start to pop.
- From here on out, gather all the beehives you see because we’ll need 10 wax for the next Flame Altar Strength upgrade.
Phase VI – The Farmer
Time for our next survivor! But first, there’s a few things we need to do…
- Make sure your weapons are repaired, you have food, water, regen, potions, lockpicks, and 100+ arrows.
- Teleport to the Springlands Ancient Spire.
- There’s a Flame Shrine just to the northeast near the top of the hill. Jump off and go get it! Pick up any Tomatoes you see.
- After you get the spark, teleport back to the Spire.
- Mark Building Blocks: Springlands to the north. Fly there.
- Descend into the stone structure. If you have trouble seeing, equip the glowing Wailing Blade. Kill the spiders and take their loot.
- Open the tomb and get the bone blocks.
- Repair gear at Anvil on way out.
- There’s a Flame Shrine to the northwest. Run to it. When you get to the cliff edge, fly over the crevasse. The entrance is below on the north side of the hill in a cave.
- Note our first Gem Forge is in the shroud directly east of us. We’ll look at it later.
- Mark and head to the Vault of the Farmer via the Growing Stronger Together quest. Remember to loot any bees nests you see if you don’t have 10 wax yet. Also, cut down any red trees to get their resin. You’ll want it for later. You’ll pass a nice little pond that’s great for fishing.
- When you arrive at the vault, the entrances are on either side.
- In this vault you have to activate 3 buttons. Start with the left side and work your way through the puzzles. The top level has you run around the outside to the other side of the structure. That’s where the final button is. Glide on down and into the survivor chamber.
- Awaken Emily the Farmer!
- Next, exit the vault and run west-southwest to the little town of Wescott. Liberate the town. Fill your water at the well. Repair anvil in one of the buildings. Find Martha’s Stories to unlock Tavern Stories quest. Go and complete it just to the north.
- Hit the Flame Sanctum to the west. Get the spark.
- Spend any skill points you have. Also make sure your food, water and regen with Midnight Lily is up!
- Mark the Elixir Well to the South. Go and liberate it! Note it’s better to go straight into the well before fighting things around it just to make sure your weapons still have durability.
- Note this well is tough. It has multiple spawners. Have to be very careful and kite the enemies. Remember, it’s OK to run away to lose aggro and charge back in.
- When the root is down, Teleport back home. Open magic chests and R to stack deposit items. Repair items at workbench. Commune with flame.
- Use Summoning Staff. Place the Farmer. Craft bed for and assign to Farmer.
- Take any and all quests that pop up.
- Spend any extra skill points you have.
- Head to the Flint Mine just to the west and farm 50 Flint. If you still don’t have 10 Wax make sure you get any bees nests you come across. Make sure you have water active for the Stamina.
- Go back and put the Flint in the magic chests.
- Make Grinding Stones at the Alchemist. Place it, and put 50 bones into it.
- Time to make our first little farm! Go to the Farmer, and make 2 Farm Soil. You’ll need 14 Springlands Dirt and 6 Bonemeal. If you don’t have the bonemeal, just wait for it at the stone.
- Make two Seedbeds and place them on the stone ledge next to the kilns.
- Make another helping of Farm soil (just the x10).
- Now to make your plantable farm plots, right next to your stone floor on the outside. Activate build mode and select the Terrain category. Select Box 4M and use Ctrl-mouse wheel to select the Farm Soil.
- It can be a bit wonky placing the soil. Don’t worry about making it perfect.
- Go to the workbench. Make a rake. Now use it to smooth things out. It should look something like this:

If you found tomatoes, go ahead and start making tomato seeds in one of the seedbeds. If not, don’t worry, you’ll come across them (grab them as you see them). Make sure you have a good bunch of tomatoes going because we’ll be using them down the line.
Phase VII – Miniboss, Enhanced Flame, and Animal Buddies
We’re getting close to having some real fun! If you bring up your Quest Journal, you’ll see you have nearly 20 quests. It seems like a lot and is easy to get overwhelmed, but don’t worry. We’ll knock these out! One note. The Hallowed Halls are very tough dungeons designed to be completed by a party. Stay clear of these for now. We can do them once we get the AoE that comes with Exploding Arrows.
- Time to go and kill the Matron mini-boss so we can upgrade our flame!
- Make sure you’re fed, watered, and have your midnight lily regen on. All weapons repaired. At least 5 healing potions on your hotbar and 100+ Scrap arrows.
- Make a Flame Altar and keep it in your inventory.
- Teleport to the Springlands Spire. Mark Alchemist’s Rumors as your destination.
- Jump off the Northeast side and glide toward the small mountain in the direction of your target. You’ll land on the small mountain with the Flame Shrine. Get the spark. Glide down and you’ll land in the Shroud. It’s fine, just keep running up toward your target.
- You’ll come across the Hill of Scavengers on your left. That’s where we’re going.
- Run around to the east side. When you find the entrance, place your Flame Altar outside of the hill.
- Now place it outside the entrance in the field. This is your first home made teleport point. Commune with it.
- Now go in and hit the Scavenger base! This is one of the best Scrap Metal farming locations in early game. Shoot the explosive barrels. Don’t go UP to the boss until the lower area is 100% clear. It should net you a lot of scrap metal. Note there’s many scrap piles on the ground that can be searched.
- Ready to kill the Scavenger Gorger Matron? She’s big, fat, ugly and very, very angry. She also spits poison that will kill you. So you’re going to kite her with arrows. Dodge her spit and just lay into her with arrows. She’ll go down quick. Aim for the head! Go up the ramp and take care of Miss Piggy. If you’re lucky, she’ll drop a new bow!
- Make sure you loot the golden chest.
- Teleport back to base. Take all new quests.
- To upgrade our Flame, we need:
- 10 Wax
- 10 Salt
- 5 Sparks
- 10 Shroud Wood
- 10 Flintstone
- 25 Mycelium
- 1 Scavenger Matron Helmet
- Strengthen the flame. You should have everything you need now that you have the Matron Helmet. If you’re missing anything, go out and get it! If you need more Salt, just go southeast of your base into the shroud. There’s a salt mine down there you can see poking out from the mist.
- After strengthening the flame, build a 3rd Magic Chest if you can.
- Ready to tame two goats? Of course you are! Go to the Farmer. Craft Goat Bait. Put it in your action bar. Go find a goat. Crouch and get close enough to throw the food until the flashing heart appears. While it’s eating, crouch walk up and pet it. Stop if the ? begins to blink. If the red ! appears then back off to reset it. Goats only require one pet then you can pick them up. If you have two goats and you make an empty pet bed, they’ll make a baby!
- Go back to your base. RELEASE THE GOATS!
- Now go to the Farmer. Make 2 Farm Animal Pillows, 2 Goat Feeders, and 100 Goat Food. Break the goat food into two stacks of 50 using ctrl-mousewheel.
- Place the beds, feeders, and fill each feeder with 50 food. Your goats will be happy! They’ll also start making Milk, which we’ll drink instead of water. To get the milk the goat will often run up to you, or you just visit the goat and take the milk as its generated.
- If you haven’t completed Unknown Waters, put Fireflies in your inventory and turn them into the Hunter.
- Press V and craft a Fishing Pole and 10 Simple Fishing Bait. Teleport to the Springlands Spire and go to the east side. There’s a small blue pond in front of the structure where we liberated the Carpenter. Glide to it!
- Stand on the edge of the pond and go fishing. The mechanics are pretty easy. Cast out, wait for the firs to bite, hold your left mouse button and then move your pole in the opposite direction the fish is in to reel it in. Once the red bar of the fish disappears, left click again in the 1-2 second window and you’ll catch one. You should catch a few Lakehopper and Shimmerfin.
- Teleport back to your base. Go back to the farmer and craft 10 Cat Bait. Note we keep the Cat Bait on us because we’ll come across the cat soon.
- Cook a fish and eat it to complete the quest from the farmer.
- You might have a shield in your inventory. A big ugly stony looking shield. It’s better than your wooden one. Equip it.
- We’re going to knock out another Shroud Root just west of the Flame Shrine east of the Spire in that sliver of shroud. It’s actually in a small cave down the west side of the crevasse above the mist. You can look down and see the red glow. Glide down there and take care of business!

- Teleport back to the spire. Select Bring Back the Pure Souls from your quest book and set the waypoint. Fly toward the quest. Go through the north shroud with the Elixir Well we already cleared and up the west slope to exit before turning south.
- If it’s night and you see moths, grab ’em!
- When you arrive at Fenrig’s Farm, go into the house on 2nd level. Read the book. The waypoint changed. Select it and go to it.
- Enter the Wolf Cave. KILL THEM ALL and grab the glowing soul of Fenrig Mills Jr. You can also grab Fenrig’s Axe and replace your Tainted Axe with it.
- Exit the cave and next we’re going to the nearby root that’s not on the map. The interactive map has it.
- It’s down in the shroud and up the cliff and a bit hard to get to, above the Night Sanctum. You can jump up to it.

- We’re done with this area! Teleport back to your base.
- Build a bed and summon Fenrig.
- Put items in chests, use the workbench, spend any extra skill points. Make sure you have potions and food. Refill on water at the well if you need.
- Enhance any new weapons, but don’t spend legendary runes yet.
Phase VIII – Going East
We’re going to clear the quests to the east, get more skill points, and find two more survivors.
- Make sure your gear is repaired and you have at least 100 scrap arrows. Eat, Drink and take health regen food.
- Go to your map and find Ringing in the New Year east of the Hunter vault. Mark it.
- Teleport to the spire. Jump and fly east toward the Hunter Vault. Grab the spark as you run by the shrine. Sparks regenerate every 30 minutes or with every reload of a world.
- Go around the south back side of the Hunter vault and jump down and east into the shroud. You’ll see a strange blue dome. That’s a mini-boss spawner. You can mark it on your mini-map.

- Make your way through the shroud, follow the path east.
- You’ll find the soul of the Lunar New Year Trader Mei-Yin Chen by the Banshee. Take out the Banshee and get the soul.
- Mark An Eternal Spell to the east. Go to it. Don’t fall in the Lava Chasm! You’ll have to find a high spot to glide over it when you’re around 70m away to the north.
- Go down into the Tomb. Kill the monster in it and you’ll loot Eternal Ice Bolt. This is where a mage gets their first eternal spell. We’re just completing it because it’s here, quick, easy and awards XP. I delete the spell because I’d play a mage on a different world, but you can keep it if you’re thinking about trying a mage build in this world.
- Head out of the tomb and look for the nearby spire to the southeast. That’s where we’re going next.
- It’s a bit tricky because there’s lots of lava around, but make your way to the spire and don’t fall into the lava.
- Complete the Low Meadows Spire puzzle and register it.
- Teleport back to base. Repair. Put items in boxes. Check Arrows. Food. Etc.
- Make sure you have at least 200 Scrap Arrows.
- Summon Mei-Yin Chen. Make bed. Assign. Accept Quests.
- Teleport back to the Low Meadows Spire.
- There’s a Flame Shrine to the east. Jump and fly to the abandoned village and go south. The shrine is down below. Get the Spark.
- Go to the top of the Vukha Ceremony Hill. There’s a miniboss. Shoot the healers down first. Dodge the miniboss leap attacks.
- If you have the skill points, distribute them. You should have Blink now.
- After killing the big hairy leaping monstrosity, grab the soul. You can also take the Vuk’ahrrrr Blessing, which gives health and additional melee damage.
- Run to the Southeast towards the Undiscovered: Night Sanctum. You’ll see a cavernous rise in the shroud across the lava river. You’ll want to go south and on the high ledge to jump down over the lava into the cavernous area. It’ll update as the Night Sanctum. Don’t bother doing it because it’s just a Gem Forge.
- Follow the road east to Fox Chase and liberate the ruins from the evil root!
- Teleport back to base. Repair. Deposit. Accept any quests.
- Craft and place a bed. Summon the Soul of the Assistant Marianne Reed (Q/E menu). Accept quests.
- Make sure everything is repaired, you have food, 200 arrows and are good to go.
- Make sure you have a gem on you. Any gem will do.
- Craft a Flame Altar and have it in your inventory.
- Teleport to Low Meadows Spire. Go to the northeast side and face east. You’ll see a broken bridge going over the lava. You want to land on the north (left) side of that bridge. We have to run north along the ridge to get to our next spot.
- Open your map and mark the Flame Sanctum just northeast of Finding and Using a Gem Forge as your destination. When marked, jump off and head for the north end of the bridge. You’ll find a trail that runs north south. Follow it north toward the shrine.
- If it’s night, grab any Midnight Lily you see!
- Once you get the spark, run back to the main road by the weird old house. Set up a temporary flame altar for teleportation because we’ll need to come back to this area. If you don’t have stone, just hack some with your mining pick. That way we can just teleport back to this area to finish all the quests.
- Place the Flame Altar in the field next to the weird old house.
- Teleport back to your base. Repair. Salvage items. Deposit in chests.
- Go to your Drying Rack and dry at least 5 Purple Berries.
- Rest up. Make sure you have arrows, food, water, etc. We’re going on an adventure!

- Teleport back to the Altar you just placed. Mark Finding and Using a Gem Forge quest. Run to it down in the Shroud and use it. This will activate Heart of the Lair to the east.
- Mark the ? to the south and head on down. It’s a Gem Forge. That will update the quest to the Shroud Lair called The Heart of the Lair. Follow the path downward to the southeast and it’ll end at the entrance of a cave with lots of red lava. Head in!
- This area can be a bit tough. You’re going to descend into your first Shroud Lair, which is how you farm Archaic Essence, which is needed to socket and upgrade jewels. Follow the path down toward the lava and enter the lair. Watch your time. Don’t pick up the time at the entrance; save that for when you exit. When you break humanoid spawners, they’ll open the walls. Go in and loot the tan balloon plants and kill any Beholders. Gather all the Archaic Essence you can as you make your way through the lair. Note that Lairs don’t have roots and are designed to be hard to navigate, so making sure your time doesn’t run out is critical. There’s multiple time capsules spread throughout the lair to help out. Note on this lair, you go UP to clear and DOWN to exit. Other lairs are DOWN to clear and UP to exit. Also note this lair is on the small side since it’s your first. Others are much larger and more complex (and easy to get lost and die in).
- You’ve cleared it when you enter the large chamber with the wall of lava. There’s a Gold Chest up top. Start making your way down again. Grab the time expansion on the way out. Set the waypoint for the Finding and Using a Gem Forge quest. The fastest way out is to follow the red river downwards.
- Get out of the Lair, run to the forge, and socket your first gem! I put bleeding in my main melee weapon. Note you can remove a gem at a forge anytime, so if you get rid of the weapon, you can unsocket the gem, salvage the weapon, and throw the gem into another weapon.
- Mark the Finding a Garden Gnome quest to the north and head out of the shroud to get your own garden gnome!
- Always good to cut down the Activated Mycelium plants as you’re making your way through the shroud so you have enough to make more magic chests back at your base.
- Arrive at the Wistful Fields farm. Kill the mutant Ewoks. There’s a silver chest in the attic along with a lore book.
- Dig in the garden right in front of the house in the mound of dirt and pick up the Garden Gnome!
- Teleport back to base. Repair. Salvage. Deposit. Check 100+ arrows. Food. Drink.
- Place your gnome next to your garden!
- Teleport back to the altar you set up next to the Shroud Lair.
- Open map, mark Unique Equipment: Springlands.
- To get to the waypoint, you’ll need to run back the way you came (northeast) and then curve around to the west to avoid lava.
- When you approach Netherton from the east, you’ll see a glowing scroll to your right in a window. Go and read it.
- Go inside. When you arrive at the bridge, halfway through turn to the south (left) and you’ll jump down where you see a board over the lava. Jump on the platform and there’s a secret door. Open it, go in and get the staff. Climb back up to the bridge.
- Mark Clothes – Springlands: Flame Pact Set and run to it. Go into the crypt. Open the secret door behind the barrels. You need to first swing to the lower level to hit the button. Swing back then swing to the upper level to open the casket where you receive a vanity armor set. Toss it on to look dashing!
- Mark A Story of Rot on your map and run to it. Read the Obelisk.
- There’s a Round Sea Urchin collectible in a tent to the west.
- Next, go to the Flame Sanctum to the west-northwest. Note you’ll need to run around the small hill on the northeast side up the path to reach it.
- Remember to gather all mushrooms, honey, wax, and twigs you can as you run.
- You’ll come across a Night Sanctum as you’re heading to the flame. Run it if it’s night.
- Take the path up the north side of the mountain to the sanctum. Grab the blessing and the spark.
- If you need to repair or get more arrows, teleport back to your base take care of business.
- Time to clear a two more roots!
- Teleport to the Low Meadows Spire. See the Undiscovered: Ring of Rot that appeared to the west of the spire? Mark it, and make your way there. Purge the evil! Don’t forget to get the Gold Chest down below.
- Teleport back to your base. Deposit. Repair. Check Arrows. Food. Etc.
- See the Undiscovered: Shroud Root that appeared east of your base and the Saline Mine? Mark it and head on over! The root is in the middle of an island. Fly down and destroy it! There’s also an Elevated Sea Urchin collectible near the root.
- Spend any extra skill points.
- Mark A Lantern for Mai and go to it. You have to enter the northeast house, go up, jump and grapple to get to the top of the wooden framework to reach the southwest house. It’s in a silver chest on the roof.
- Teleport back to base. Take quests. Hang the lantern.
- We’re done with the Low Meadowlands!

Part III – Revelwood
We’re going to start making Explosive Arrows, craft our Level 13 armor, start our Flax Farm, and really upgrade our gear. Plus, Revelwood is beautiful; probably my favorite lush biome in the game with its massive trees and deep green.
Phase I – Mopping Up
Before we head to Revelwood, we need to complete a handful of Meadowlands quests on the edge of the new biome.
- Make sure inventory is deposited and you have 4 Magic Chests. Food, Drink, Regen. 200 scrap arrows and are repaired.
- Mark Unique Equipment: Springlands just north of your Altar by the Hill of Scavengers. Teleport to the altar. Run to the waypoint, which will become the Mistbury Catacombs. This will remove the mark. Note I generally don’t do the Queen’s Tomb because it only gives a nice shield, Pikemead’s Bulwark. We’re a ranger. Not really focused on shields.
- Time to get the Alchemist’s Mortar. It’s to the north on your map as Animals and Pets. Mark it and run! It’ll take you in the the Shroud and then to loop around. This is also where we’ll get our Cat! The lower town is Lone Thistle, and the tower we go up to the Alchemist’s Tower. Careful, there’s level 15 mace whacking bastards. When you enter the tower, close the door so the cat can’t get out! The top of the tower is out of the shroud. Head up to refresh your timer. Kill the critters and tame the cat like you did the goat. Note the cat requires 2 rounds of hearts.

- Go to the very top and get the chest and lore.
- If you want to unlock the door in the basement, the button you’re looking for is at the top of the second highest roof. Jump down and through the hole. Hit the button. Outside of the button room is a silver chest. Loot it. If you haven’t already, make your way into the basement. Get the Mortar. Note for future runs you can skip the button entirely by pickaxing the wall next to the iron door and punch through it.
- Run up and out of the shroud and teleport back to your base.
- Talk to the Alchemist. Turn in the quest and place the Mortar somewhere off in the corner.
- Place the cat. Go to the farmer. Craft a Cat Pillow, Cat Bowl, and Cat Food. Place and fill.
- Make sure you have at least 10 lockpicks.
- Pet the cat and get Paw’s Touch buff which is +25 health and lasts 30 minutes.
- Repair. Salvage. Deposit. Check Arrows. Check potions. Extra skill points to spend? Spend ’em!
- It’s time to prepare for our first set of Explosive Arrows. Go to one of your kilns, set it to Tar, and fill it with 50 wood.
- Teleport back to the Scavenger Altar. Mark Lunar New Year Plants and run there.
- Welcome to Fort Kelvin! Since you came from the west, you can enter through the sewers. Eww!
- There’s a lost soul in the top of the highest tower which is We, The Only Ones quest. You can do it!
- In the sewers below in a silver chest are new building blocks.
- There’s a decorative flower pot in the top of a broken house you can get to by using your grappler.
- Once you have the lost soul, open your map and mark A Test of Skill. Run north through the fort, then turn east and exit over a wall that’s guarded by spiders. Wrap around to the north.
- This is where you’ll see your first light blue plant – FLAX! Pick it all up! You may also see Indigo plants. Grab all of those. They’re dark blue.
- Go to the Obelisk and read it. The clay that was once here has moved! So we need to go and find it. Exit the Obelisk area to the east before going north and through the Cave Passage that leads west. Don’t fall down the ledge! Grab all the Flax and Strawberries you see! When you exit, continue west southwest as seen in the map below and you’ll find what we’re looking for. Mine 100 clay! This will let us finally make explosive arrows as well and fired brick.

- Teleport back to your base.
- If you’re inflicted with Hemotoxin you’ll need to cure it because your health won’t regenerate. You’ll need Spider Glands and Moths in order to do this; you can find them fluttering around Revelwood at night. Once you get moths, you can craft the antidote. Note the antidote is in Manual Crafting (V Menu)not at the Alchemist!
- Time to switch from Wolf Meat to cooked Raw Game Meat. We have to manually cook it, but don’t worry. We’ll get a cooking station shortly that’ll cook as much as we need.
- Now that you have clay, go to the Carpenter and make a Kiln. Place it next to your Kilns and put half of your clay in it. Put 50 logs in it and start making Fired Brick.
- Go to the Seedbed. Browse Recipes for Flax. Put however may Flax you got in there (1-3) with the required water.
- Run to the Flint Mine that’s west of your base and get 100 Flint. You’ll probably have to run back to your base and repair your pickaxe. When you’re finished, go back and don’t forget to grab the Tar you started earlier.
- Make 100 flint arrows, and then 100 explosive arrows from them. Now you’re really ready to have some fun!
- You only want to use your explosive arrows with tough groups or bosses. Also note when we get the SHELL SHOCK skill our explosive arrows will stun groups. It’s amazing. For now, it just does AoE damage. But when we get that skill, they also act as crowd control.
- Open map, mark Player Customization: Haircolors. Teleport to the Altar by the Forge and make your way into the shroud. Note this will mark Elder’s Night Sanctum on your map. If it’s night, do the dungeon. If not, you’ll need to come back to complete the quest.
- Next, mark and complete Vukah Rituals Uncovered by grabbing the daggers. You’ll return them to the hunter.
- There’s an Elixir Well just East Northeast of the Sanctum. Run to it and PURGE THE EVIL!
- You’ll see your first corrupted boars. Kill them because we need their tusks.
- This well has a giant nasty bug as the miniboss. She spawns buglings and spits poison. Use your Explosive Arrows here. Blast her and the little chittering buggers to pieces. Make sure you have healing potions at the ready. There’s a Gold Chest on the side opposite of the root on a ledge.
- Use your skill points! You should have WATER AURA by now, which is an amazing passive healing system. You can keep using the Midnight Lily, but using a Dex food in its place would probably be better now that you have this healing mechanic.
- Note you got Giant Critter Scales. We’ll need these!
- Teleport back to base. Repair. Salvage. Deposit. Check Arrows. Lockpicks. Potions. Food. Enhance Weapons.
- If you got Elio, summon him. Make a bed. Assign. Take his quests. Note he only offers cosmetic quests.
- Time to liberate a Elixir Well that’s not on our map yet. It’s in the shroud just west of the Ancient Obelisk and northwest of Fort Kelvin. Teleport to the Scavenger Altar and run north into the shroud just west of the obelisk. You’ll come across another serene pond that’s great for fishing.
- Farm 30 Shroud Mushrooms on your way by cutting them down with your axe. We’ll need it for making Medium Chests!
- This well has a small army guarding it. Use your exploding arrows to teach them a lesson. A Banshee may drop the Gem of Hopeful Embers, which allows you to stay in the shroud indefinitely if you keep killing monsters. Up to you if you want to use it. Liberate the well! There’s a Gold Chest in this well, you’ll find it behind a banshee after destroying the root.
- Teleport back to base and put any additional Flax you found in the Seedbed to make more seedlings. Make sure there’s water.
- You should be able to make the Improved Grappling Hook at the Carpenter. We can’t do the glider yet, but make the hook.
- Check your seedbed. Any Flax seedlings? If so, put it in your action bar and start planting them! I press X and use snapping. I walk sideways while clicking like crazy to plan rows. It’s very quick. Don’t worry. Soon, we’ll have more than we can use.
- We have a root to destroy before finally heading into Revelwood. Bring up your map. You’ll see the Undiscovered: Shroud Root just northwest of the Alchemist’s tower. Mark it, teleport to scavenger altar, and run towards the root.
- Remember to grab all Twigs, Flax, Indigo and Forest Beets as you run.
- As you approach the root, you’re going to enter a part of the forest with huge trees. Chop down two of them and get the Hardwood.
- You’ll see the Lumenlight Cave Entrance. The root is deep in the cave. Go in, kill the boars, get some meat, and take out that root! Careful; it’s got the slowing goo all around it. Pick ’em off from a distance and hit the groups with exploding arrows.
- There’s a gold chest up on top of a wooden deck. Kill the archer, climb up and see if there’s any goodies inside!
- Teleport back to your base. If the Carpenter has a quest, talk to him. It’s about the advanced glider.
Phase II – Revelwood Spire, Spindle, Crucible and Sawblades!
Time to truly move to the next biome!
- Clear inventory. Repair. Spend skill points. Make sure you have 10 lockpicks, 5 healing potions, 200 Scrap Arrows, 100 Exploding Arrows, food, and rest bonus.
- Teleport to the Springlands Ancient Spire. To get to the Revelwood Spire we have to run behind the Ancient Vault – Farmer. So jump off the north end, fly toward the vault and go around the west side of the vault. You’ll pass through the Withered Encampment. Read the note. Stay on the main road going North.
- Grab the Indigo, Strawberries and Flax. You’ll also see the new big mutated mushroom mobs. They aren’t aggressive, but drop Penny Bun and Poison Sacks.
- Welcome to Willow Crush! This is how we get into Revelwood. Careful, there’s traps everywhere. This is also where you’ll encounter the nasty dual-wielding poison attacking bastards. But using your blink ability paired with multiple arrows to the face takes them down pretty quick. The good news is they drop the Gem of Puncturing, which is what we want to put in our bow.
- After you cross the bridge, you’ll see you’re in the area for the Lunar New Year Sword quest. Do it right quick. It’s a lore item at the top of the house. It changes the quest destination.
- Set destination for Oswald Ander’s Chest. Run there. Do not jump down. Stay at the same level and run around the cliff.
- Dig up the chest under the mound of rocks at the encampment and get the loot.
- Next go to Diadwyn and do the quest Diadwyn and its Building Blocks quest. The blocks are in a silver chest in a tent next to a lore book that starts a new quest Elixir for All. Raid the gardens and get Strawberries, Stinging Nettle, and Forest Beets!
- Time to hit the Revelwood Ancient Spire which is the quest Reclaim the Wilderness. Mark it as a waypoint and run to it! You’ll need to go Southeast and hug the southern part of the hill and glide down one level. Just glide ONE level down, NOT two.
- Also pickaxe 5 Revelwood Stone.
- Mark the deposit of Clay you come across on your minimap.
- Complete the spire! Lots of shooting targets. When the spire is done teleport back to base.
- Take quests.
- Your Carpenter can now craft the Quick Stack Station, which allows for a single-click action to auto-store all materials from your character to your magic chests! Great QOL feature added with Release 8. Build one and try it out!
- We need to complete the quests so we can make Linen, forge Copper, and make Wooden Planks.
- Go to the Farmer and make Dog Food Bait. Keep it in your inventory as we’ll be getting a puppers shortly.
- Repair. Deposit. Check Food. Check Arrows. Spend Skill Points. Be ready for adventure!
- Harvest your Flax. You should also have more seedlings and enough flax to put 10 in the Seedbed. That’ll give us 100 seedlings. Go for it! Also grab the seedlings that are in there and plant them. Put the rest of your Flax in one of your Magic Chests. As soon as we get the Hand Spindle we’ll start making Linen.
- Before we get the Spindle, let’s load up on Hazlenut, which is used to create additional taming food baits. We don’t cut the bushes down. Instead, we harvest them. There’s a bunch just south of the Revelwood Spire, as seen below. You can glide straight on down.
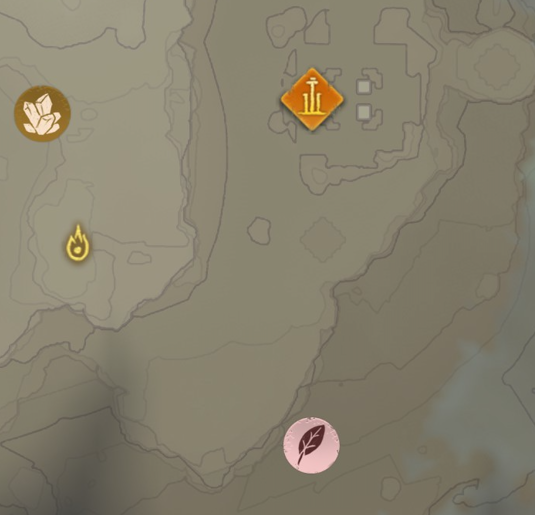
- When you’ve harvested the bushes, teleport back to the Spire.
- We’re heading for the Cave Entrance just Northwest of the Revelwood Spire. That’s where the Spindle is. Teleport to the spire and glide down on the plateau to the west.
- Sadly, my favorite place for Clay and Copper was removed with the last expansion, but we have our first clay spot and you should have seen another running to the spire. When you head northwest to the cave passage, you should pass a small Copper bulge in the ground. Mark it. If we dig down, we’ll get a ton of copper. We aren’t ready to mine yet, but mark it on your map.
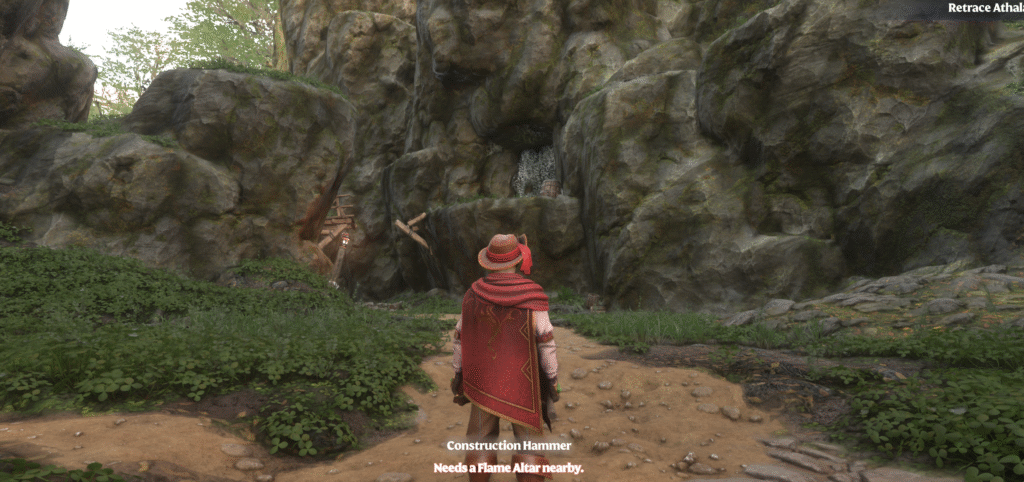
- Keep heading to the Cave Entrance. You’ll fly down one level. That’s fine. Grab all the Flax and Indigo you come across.
- Run up where the copper is in the cliff and wrap around to jump over a broken bridge. That puts you in the cave.
- Grab all the Azure Russula.
- Prepare for a spider fight. Melee is fine. Don’t need to waste arrows, but you can use them on the big tarantulas. Break the webbing to continue through the cave.
- Read the lore, get the Spindle and teleport back to base!
- Place the spindle and fill it with all the flax in your magic chest using the +10/+1.
- Repair, Deposit, etc. Make sure you have rest bonus and all foods active.
- You’ll also want to replace your Midnight Lily food (health regeneration) with Gloomberries.
- Now for the Crucible. Select the Elixir for All Quest, teleport to the spire, fly west and make your way to the quest area. Pick up all Flax you see. Chamomile, too. It makes great tea and is used to make Greater Health Potions.
- For the Elixir quest, you’re looking for a fenced cavern quarry called Mark of Seth. Both the Elixir and Crucible are in there.
- You’ll find both Clay and Copper outside of the entrance and plenty of copper inside if you ever want to mine the area.
- There’s a fossil on the lower level as you enter on the right. Shoot the exploding barrel.
- The Crucible is on the ground level – just follow it back into the cave. Once in follow a ramp up to a lore scroll. To the right of the scroll is a pile or dirt with a glow behind it. Blow up or dig through the pile. The Crucible is behind it.
- Once you have it, Teleport back to base.
- Talk to Blacksmith. Build a Smelter. The 50 Fired Brick you made should already be done and in your Furnace.
- Take quests. One will be to build a Kettle. That will auto-cook our food.
- Also, farm your Flax. Should be done. Put 10 Flax back in the Seedbed with 20 water to make 100 seedlings. Hit the water well in town if you need to.
- And now… Charcoal. Set both Kilns to Charcoal and go out and farm 200 wood. Put 100 in each one. Make sure they have the necessary dirt and get those buggers making a ton of Charcoal.
- Time to go to mine Copper in Revelwood. Fly on over and start mining at the locations you prefer. Make sure you used water or goat’s milk (better), and mine until your pickaxe breaks. It’s slow going now because we have a scrappy pickaxe, but don’t worry. We’re making a copper pickaxe with our first haul. You should get 25-30.
- Teleport back. Repair. Grab all Charcoal from both Kilns. Make sure you have 100 scrap and explosive arrows.
- Put all the Charcoal and Copper Ore in the Smelter. First batch will take 5 minutes.
- While that’s doing its thing, time to get the Table Saw for the Carpenter! Mark the quest, teleport to the Revelwood Spire, and jump off the southeastern part over the lava and toward the quest. You’ll take the Cave Passage you discovered earlier to get Clay.
- If it’s night, start collecting moths. Also get any Flax and Indigo you see.
- You’ll see a farm called Lush Pasture to the east full of the red killer plants. There’s farmer cosmetics (Hat, Chest, Pants, Boots) scattered about.
- Follow the path north as it winds east and southeast to Thornhold. This is where the dog is! Clear things out. Make sure you don’t accidentally shoot the dog… He’s usually in the mini fort inside the wooden fences with all the ranged guys. To tame the dog, do the same thing as you did with the cat.
- Once you tame the dog, it’s time for the sawblades!
- Look at your map. The sawblades now show to the northeast of town. Mark it and run there.
- The location will update once more. Mark it and run there (to the Northeast again).
- Enter Fawnsong Frontier and kill everything. Head right up the slope. The blades are at the top. Grab them! Also open the silver chest.
- But wait! There’s more! The fat poison spewing mini-boss is across the bridge! But this time, she summons wolves with her horn! Time to pay her a visit!
- When she’s dead, run to the top of the tower and get the golden chest.
- Teleport back to base.
Phase III – New Armor, Copper Arrows, and Advanced Glider!
- Repair. Deposit. Commune with the flame.
- Talk with the Carpenter, craft and place the tablesaw.
- Grab the copper bars from the smelter. Craft a copper pickaxe. You may have gotten bars from monsters, if you can, make the copper axe as well. Delete the old ones you replace.
- Upgrade your new copper pickaxe and copper axe.
- Place the dog. Go to the Farmer and make a dog pillow, bowl and food. Set everything up.
- Your 100 Flax seedlings should be done. Plant them!
- Go out and farm 100 wood to put in the tablesaw.
- Time to craft our first Medium Magic Chest at the Carpenter! The Alchemist can craft both Shroud Cores and Goo. To unlock goo, make bug dust.
- Start putting new Revelwood items in the Medium Magic Chest. Linen. Copper Bars. Anything that you make from now on – in the Medium chest. Use the other 4 chests for the core items, but after you have 4-6 stacks of Scrap Metal and such, you can just destroy the rest. The only exception is Twigs and Charcoal. You want a lot of those.
- Go out and get another 200 wood. Set one Kiln to Tar and the other to Wood Acid. Split the wood and fire them up!
- Now that we have a shiny new Copper Pickaxe, it’s time for a second Copper Ore run! Drink Goat’s Milk or Water, glide to your favorite place and mine until your new pickaxe breaks.
- Teleport back to base. You should have 55-65 Copper Ore. Toss it in the Smelter, which should already have plenty of Charcoal.
- Check to see how many Shroud Sacks you have. You need 8 for the Advanced glider. If you have them, make it! If you’re missing any components make note because you’ll get them when you get amber in the next step.
- While that’s churning away, we need one more component for our new armor set we don’t have. Amber. The good news is there’s an Amber Vein just below the Revelwood spirenext to a patch of Acidic Mycellium. Let’s head there and get some!

- Go ahead and mine 20 Amber just to get some extra. To exit the Shroud just run north/northwest and go up the slope. Kill any corrupt boars you see to get their tusks. Also, if you didn’t have enough Shroud Sacks to make the Advanced Glider, kill the boars and the blue plants to get the 8 you need before exiting the shroud.
- Teleport back to base.
- If you didn’t already, make the Advanced Glider. Destroy your old one. Now we can glide without looking like a scrub!
- We should finally have everything we need for our new armor set. Note we’re going with a mix of Tank and Marksman. I’d do Ranger, but it requires Reptile Scales, which don’t drop until we move to the next Biome. I’m not sure why the developers made Level 13 gear require those scales, but the Marksman gives us damage bonus to headshots where Ranger does damage bonus to all shots. Headshot damage is fine for now.
- If you’re short Giant Critter Scales, just go to the Elixir Well east of Fort Kelvin and fight the buggy mini-boss again.
- To make our new armor set, we need:
- 14 Linen
- 9 Charcoal
- 10 Dried Fur
- 10 Copper Bars
- 3 Amber
- 5 Giant Critter Scales
- 5 Shroud Mushroom
- 4 Brittle Shroud Petals
- 1 Corrupted Boar Tusk
- 1 Twig and 5 Plant Fiber
- Get your copper bars from the Smelter and put them in your Medium Magic Chest.
- Go to the Blacksmith. Make the Tank Chestplate, Pants and Boots.
- Go to the Ranger and make the Marksman Gloves and Helmet.
- Now upgrade each new armor piece!
- Go to the Carpenter and make a Mannequin.
- Put your new armor on and put the old armor on the Mannequin.
- Old Armor was 99/58 resistance. New armor is 159/85.
- We’re also switching from Scrap Arrows to Copper Arrows.
- Time to make another Copper Ore run! Mine until your pickaxe breaks. Come back, toss all that juicy ore the Smelter.
- From here on out, you may need to make Copper, Clay, Flint and Wood runs (for Tar) to make Copper Arrows and Explosive Arrows. I recommend trying to keep at least 200 Copper and 100 Exploding on your character at any given time so you can be sure you won’t run out if a long fight comes up.
- I recommend making a Clay run until your pickaxe breaks. Toss all that in your Medium Magic Chest because you’ll need it to make Explosive Arrows.
Phase IV – Skill Points and Fell Commander Bow
Things are really coming together. Your character should be destroying enemies now, especially if you have an upgraded legendary bow. If not, make sure whatever you have is upgraded (without using legendary runes). Only use legendary runes on a legendary weapon. You won’t really be using melee anymore except to clear groups of bugs. Everything else is going to be ranged, and you’re going to go through arrows like they’re candy. But the damage should be excellent by now, allowing for 1-shot headshots from the back.
- Build a Flame Altar and keep it in your inventory. Time to move out! See the Flame Sanctum to the Northeast of the Revelwood Spire? Mark it and fly on over! To get to the sanctum, you’ll need to go around to the east side of the mountain.
- Get the spark, bring up your map and mark Smuggler Hideout. It’s so the south of Tower Ruin in the shroud. Fly on down and prepare to use exploding arrows. The map will update with Trade Outpost “Old Rye”. There’s a lot of mobs to kill.
- Next stop is the Elixir Well to the northeast. Restore your timer at the sphere before clearing out the vile creatures. Two mini bosses? No problem! Explosive Arrows will destroy them.
- We’re still heading for the cooking station. Climb out and select the cooking station quest and go straight east.
- You’ll come upon Pikemead’s Reach. A large sprawling castle. The biggest area we’ve been in so far. There’s a lot of quests in here including 2 roots and a boss. The good news is the boss is pretty easy for our build because of our exploding arrows.
- Put down the Flame Altar just outside of Pikesmead.
- Teleport back to base.
- Repair. Prepare. We’re going after the Monolith and Shroud Root west southwest of the Revelwood Spire in the unexplored area. There’s actually only one root deep in a cave.
- First, go to the Monolith and read it.
- Next, mark the Shroud Root to the west and fly/run there. If it’s night, get moths!
- Stay on the north side of the Red River to reach the root.
- Remember, you can 1-shot spawners from a distance with a single Exploding arrow. You can even blow up roots with them as well!
- Once the root is destroyed, get the golden chest up behind the grapple scaffolding and Teleport back to the spire.
- Mark the Flame Sanctum to the northwest. Glide/Run to it. You’ll take the path that passes the spider cave where you got the spindle.
- Get the spark and Head for the Undiscovered: Shroud Root just to the west of the Flame Sanctum. Go into the cave. You’ll see the root in the distance. You COULD just shoot the root from the top, but then you’d miss out on killing the big bug mini-boss and all it’s spawn. Exploding Arrows for the win!
- Don’t forget to loot the gold chest on the scaffolding on the way out!
- Run out and go to Follow the Melody. Location will be updated.
- Mark A Crucial Investigation. Run to it. Will update. Follow it Northeast to Glennwood’s End.
- There’s a repair anvil in town. Find the big mama mini-boss and cleanse her filth from the world with explosions. The sword is in her golden chest.
- You may also have A Time for Harvest. If so, go do that right quick. You just dig up treasure.
- There’s also a nearby Flame Shrine to the northwest against the cliff you can get a spark from.
- Lost Soul – Alchemy Assistant is also completed here. If for some reason you don’t have this quest, it’s fine. The soul is in the basement of the southwestern most spider infested house. Read the lore on the ground level. Go into the chimney stack and climb DOWN.
- Grab the spark from the Flame Shrine.
- When you get your Sword of the Serpent, it’s time to retire your wailing blade.
- Teleport back to base. Repair. Enhance the new sword. Salvage the wailing blade.
- Talk to NPCs with quests.
- Make sure you have food, healing potions, ammo, etc.
- Note the XXX North of the Revelwood Spire is a Shroud Lair. You can discover it if you want, but we don’t need to go in there.
- Teleport to the Revelwood Spire. Time to go and do Unique Equipment: Revelwood to the northeast. Look at that! A Legendary Bow as reward! Mark it and head on over!
- Get both lore books. Location has changed. Mark it and run!
- That juicy bow is around here somewhere! Head south towards the ramparts. You’ll see a Fell Commander. Destroy him, and he drops Talion’s Bow. This is probably the best early game bow you can get. To get out of the shroud, head south and take the road when it turns right (west) and goes up the hill.
- Well look at that. A Shroud Root all out by its lonesome. Might as well cut it down.
- Teleport back to base. Repair. Deposit.
- Enhance Talion’s Bow all the way and start using it.
Phase V – Elio, Pikemead, Cooking Station and Fell Wispwyvern
We’re going to take out the roots in Pikemead, get the four sparks, do multiple quests, and kill the Wispwyvern dragon. All in a day’s work! We’ll also upgrade our Flame Level afterwards.
- Before we get going, if you haven’t done it already, it’s time to grab our cosmetic survivor Elio. You can only do this at night. If it’s day, mine copper, flint or wood or twigs – whatever you’re lacking for arrows. Highlight Illuminate the Night quest, run, and enter the dungeon. Dodge the traps and get his soul. Exit the Sanctum. Run north up the slope and out of the shroud. Teleport back to base. Make a bed. Summon Elio. Assign him to the bed. Take his quests. I don’t focus on completing his quests as part of this guide because the rewards are all cosmetic. You can do them when you’d like.
- Now for the real fun! We’ve got some serious combat ahead of us.
- Make sure you have at least 200 Copper Arrows and 200 Explosive Arrows.
- You should be using: (Milk or Water) + Grilled Game + Tomato (Milk is from the Goat)
- Make sure everything is repaired and you have at least 5 Health Potions and 10 Lockpicks on you.
- Assign any extra Skill Points.
- Teleport to your Pikemead Altar.
- The ? to the south is another Shroud Lair. Ignore for now.
- Go straight in the front door of Pikemead on the south side.
- You’re going to destroy 2 roots, get sparks from a flame shrine and flame sanctum, get the kettle, and complete any other quests that pop up from lore. You might be teleporting back to base to repair or make more arrows. That’s fine. The goal is to complete everything here.
- The Kettle is in the Flame Sanctum. Also note there a gold chest outside the Flame Sanctum.
- The Flame Shrine is East of the Flame Sanctum.
- Reading the lore, you’ll unlock the Dark Rites quest. To complete this, you go to the final rampart, grapple up, run up to the rampart wall and glide south to the broken roof. Note the wand you find is one of the best mid-game wands for a Mage.
- The Garden Quest only requires you to dig in front of the statue and open the chest.
- Go back to the Rampart and repair your gear to prepare for fighting the boss! You’ll use Copper Arrows against him.
- You just need to dodge his leap and his first falling ice attack. The fight is very easy for our build.
- When he’s dead, grab his loot (especially his head, go inside, read the lore, grapple up and get the Silver chest.
- Congrats! You’ve defeated one of two bosses!
- Teleport back to base.
- Repair. Salvage. Deposit. Get Quests.
- Craft the Cooking Station and place it. Select the Raw Game Meat recipe and throw all you have in there. No more sitting in front of a fire!
Phase VI – Strengthen the Flame, Alchemy Assistant, Preparation
We need to get ready to go into the next biome, the Blackmire Swamp. But before we do that, we need to upgrade our flame!
- Upgrade your Flame. If you can’t, go out and hunt down the items you need. More than likely you’ll need to farm more Shroud Mushroom for the 15 goo (you’ll need 75 total). You might also need more corrupted boar tusks. All Mushrooms you need are just east from the Revelwood Spire down in the shroud. There’s a bunch of Corrupt Boars just south of your Pikemead Altar just over the hill in the shroud.
- Once the flame is upgraded, you can get Mei’s Lunar New Year bow, but our Legendary Commander’s bow is better. I skip that quest.
- If you haven’t already, now is the time to start a Twig Farm. Go to your Seedbed and select Shrub Seedling and create 10 of them for 100 bushes. Note you can plant these in the normal soil around your base, you don’t even need farm soil. We’ll plant them when we get back.
- Make sure you have arrows, food, etc. Make sure you have 5 stone!
- Create a Flame Altar and have it in your inventory.
- Teleport to the Pikemead Altar. Go south and get the spark from the shrine, the head southwest to the Fisher’s Tale quest in White Wind. There’s a Gold Chest in the tower where the Banshee is.
- Mark Finding Masonry Tools on your map. Make your way south to the quest. You’ll be going into the shroud. Make sure you don’t enter the red mist, you’ll die. You’ll have to go southwest to get out of the shroud.
- Stop by the Flame Sanctum. Next stop is the quest location!
- Welcome to Glimmer Rock Mine! Blast away the rubble when you first enter (on the left) to reveal the Flame Shrine. Get a spark!
- Pass through the mine and follow the trail.
- Enter the Gate to the Pillars of Creation. Go up the right side.
- Make your way through the puzzles. Read the Obelisk. Get the chests. Stay on the main slope going up.
- Get the Masonry Tools at the Research camp. Note there’s currently a bug where the tools won’t glow like a quest item. The below screenshot shows where they are.
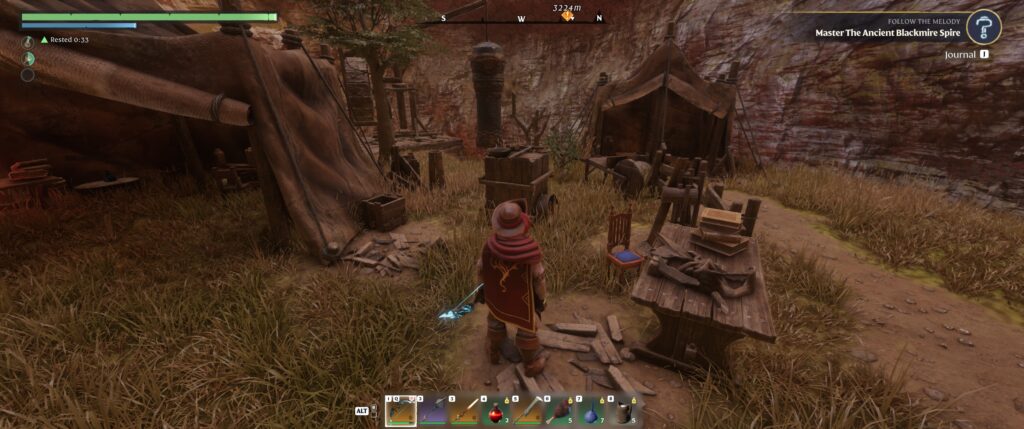
- Read the lore. There’s a Silver chest hanging from a wooden crane above; get that before continuing out the southwest side of the gigantic chamber.
- Exit through the main slope, not the tunnel near the chest.
- Place your Flame Altar right outside in the field. This is as far as we go for now. These are level 18 mobs. We’re putting the Altar here so we can come back after we complete the swamp.
- Teleport to the Scavenger Flame Altar and dismantle it. We don’t need it anymore.
- Teleport back to base. Place the Masonry Tools.
- Get quests.
- We can now craft our own Water Well at the Carpenter! One should be fine for now. You’ll need to make a bucket first.
- All of the quests are for the highlands. That’s not where we’re going, but will be soon.
PART IV – Blackmire
Next we’re heading to my least favorite biome! Swampy jungles full of puzzles and frustration. But we’ll also get the Bard and eternal frost arrows, so it’s not all bad.
Phase I – The Passage
- Get some of those bushes for twigs planted! We’ll farm them when we get back.
- Make sure you have food, arrows, healing potions and are repaired.
- I don’t recommend going into the swamp during the night! If it’s night, go back to your base, mine some copper, make base enhancements, or build some comfort items.
- Now it’s time to head into the Blackmire!
- Teleport to the Revelwood Spire.
- Look at your map and see the passage to the west. There’s a narrow canyon that goes north. Head for it! Once you make it through the pass you’ll be introduced to the jumping trampolines.
- When you enter the swamp area, be very careful. The giant bog lizards can 1-shot you (with a crit). Note these are the buggers who drop the Reptile Hide that lets you craft the ranger armor set. Go ahead and kill 3 of them to get 3 hide, but don’t go near the water edge or they’ll slam hit ya.
- Time to move on! Run through the northbound tunnel and follow the path.
- Quick note. There’s purple flying spores in the trees. SHOOT THEM. They multiply and are homing bombs and can do quite a bit of damage. Also kill any giant wasps you see.
- Make your way through the Vuk and down the path. Take the left path downward as it branches.
- Welcome to the second slog. Kill the reptiles if you want or just take the left side ledge through.
- Follow the path down and you’ll come upon an old ruined outpost. Get the lore book on the left by the fire and climb up the wall. Clear the outpost, glide down to the path and take the RIGHT path (North) down the steep stairs.
- Pass the mutant ewok outpost and the resurrection shrine. Make your way to the spire via the N path. You’ll come across the Snapjaw Tar Pits.
- Use the jumping pads to get to the Monolith and read it.
- Go down and to the north to another jumping pad that will launch you eastward. Take the next few pads that’ll launch you onto a climb rail. Once you get to the top, follow the path to the spire.
- Reach the spire and do the puzzles. This one has you jumping outside and if you misjump, you’ll have to start over. It’s a pain and I hate this spire because jumping on the roots outside isn’t very intuitive and it’s easy to slip, and if you do… you have to start all over again.
- When you’re done with this mario slogfest, register and teleport back to base!
- Repair. Salvage. Deposit.
- Place Lady Lechar (Alchemist Assistant). Take quests. Make bed.
- Farm your twigs, and plant more! Also create another 100 seedlings.
- Get your Copper Arrow count back up to at least 200 and make sure you have at least 100 Explosive Arrows.
- Put your Reptile Hide into the Drying Rack (all of it) with Salt and start making Reptile Leather.
Phase II – The Bard, Eternal Frost Arrow, and Shroud Roots
- Mark the Follow the Melody quest in Sunken Ancient City.
- Make sure you have food up and running!
- Teleport to the Blackmire Spire. Fly to the Sunken City and land at the Ancient Vault – Bard.
- Now for the fun! You need to find the 3 buttons.
- You can technically jump and fly from the spire to the top of each of the 3 buildings at or near the buttons. If you want to quickly hammer this out, just fly to each from the spire. If you want a bit of adventure, follow the below steps.
- Start by flying to the building to the south (land at the bottom and jump up on a root from the wooden walkway). The first button is at the front facing north. Very visible and easy to see.
- Fly back to the Vault – run to the top. Go to the west side. Get the Gold Chest.
- There’s two buildings in front of us. Go to the left/southern one first. Enter the slot chamber of the red plants, go around corner. Kill them all. Go to trampoline, jump and climb wall. Second button is to the left before the trampoline.
- Take trampoline to the building to the north (jump up and glide over). Careful of the basement slog. Nasty big reptiles. Make your way up (take root, run around the roof to the rubble side and jump up the rubble). The button is on the top level facing south.
- The Chamber is open! Run down and get the bard!
- Teleport back to your base. Summon the Bard. Make bed. Assign. Take quests.
- We can now make the Medium Backpack at the Bard! Once you have enough Reptile Leather, make that new bag!
- If you need more Salt, there’s a Saline Quarry directly Southeast of our base. You’ll see the wooden wheel from a distance. Fly on down and get all the salt you need!
- Now it’s time to get our Eternal Frost Arrows. First, we have to do the Daggers for the Bard quest. Mark it as your waypoint.
- Make sure your have arrows, food, lockpicks, potions, etc.
- Teleport to the Spire, jump and fly on down!
- The Daggers for the quest are down in the muck stuck in a dead reptile.
- Teleport back home, go to the Bard and take the quest Magic Arrows.
- Mark Eternally Piercing as your waypoint, teleport back to the spire, and fly over!
- You can either glide down and land right on top of the arrows, or climb the tree and kill the rabid giant ewoks! If you climb the tree, you’ll find the arrows up the ladder to the right of the lore book.
- These arrows never run out. They only do 11 damage and cost mana to use. But they do ice damage, which slows targets. Use them when you have mana to take out easy targets. That’ll save you arrows!
- Note when you get BLESSED ARROW (+20 mana on crit) paired high crit will make sustaining the arrows nearly unlimited! They may not do as much damage, but they work in many situations and save you a ton of arrows.
- Now it’s time to take the roots out! There’s 3 Undiscovered: Shroud Root marks on your map from the Obelisk. Take them out. Do them in any order you’d like. Mark the root, go to the tower, fly to the location and get your skill point. The order I do is:
- Southeast, Southwest, Northwest
- This way when you’re done, you can do the Hand Drum for the Bard quest if you want. It’s up in the tree and quite a journey complete with mini-boss.
- Teleport back to your base!
I skipped a lot of quests in Blackmire. If you want to go back and explore more, feel free to do so. There’s a lot more to do, but nothing that impacts our progression as a ranger.
We’re ready to move onto the next biome!
PART V – Nomad Highlands
Ready for the next leg of our adventure? We’re entering some of my favorite biomes; plains and desert. We’ll get new armor, crafting stations, resources, arrows, and more. Our Ranger is really going to shine!
Phase I – Tanning Station
The Highlands is a nice change from the muggy Blackmire biome. It’s open, fun, and quite enjoyable. Let’s get to work!
- Spend any extra skill points. Make sure you’re repaired, have arrows, potions, lockpicks, etc.
- Craft a Flame Altar and have it in your inventory.
- Teleport to the Flame Altar we left after passing through the Pillars of Creation.
- Select the Flame Shrine to the south. It’s west of In Need of a Tanning Station. Run to it.
- Feathers are going to become very important for making our next tier of arrows. Make sure you kill and loot everything!
- Get the spark. Run west from the shrine until you see a deep hole that reveals a chamber far below.
- Jump down and fly to the bottom. There’s a Gold Chest with the Dragon Sword. This will replace your Sword of the Serpent, but only when you get back to base and upgrade it.
- Mark and run east to the ??? and loot the Sugarcane, Rooibos, Sage Leaves, Bell Pepper, and cut down a few Aloe plants and take their resource.
- Place the Flame Altar in the field next to the shroud as seen below.

- Teleport back to base. Repair, Salvage, Deposit, check food and arrows. Any plants that need to be harvested/planted.
- Teleport back to our temporary Altar and dive down (south) into the Shroud, then start heading west.
- Mark the ? to the west of us and run to it. That’s the Gem Forge. The other is a Shroud Lair.
- Head southwest to the Elixir Well.
- You’re going to start seeing the green mushrooms, which give Mint Mushroom Meat. Feel free to start collecting it.
- You may also see your first Shroud Tentacle. Kill them! They give Shroud Adhesive.
- If you see the Giant Red Mushroom enemies, kill them for Ammonia Glands.
- Liberate that Elixir Well! Note you might get the Fell Curse. If so, you’ll need to cure it with Fresh Shroud Spore (the glowing white spores that are at the center of fell spawns at night).
- Make sure you kill all the Flying Insects to get their Critter Glands and the jellyfish-like Shroud Depthdwellers, who also drop Shroud Gelatin.
- This is the first time you’ll see the flying jellyfish things. They’re nasty. Kill them from a distance. Do not get under them and don’t let their projectiles hit you. You can shoot their projectiles.
- When you’ve destroyed the root, teleport back to your base and repair, etc.
- Teleport to the temporary Altar and deactivate it.
- Set waypoint for Almanac for Plants and Seedlings.
- Get the 3 lore updates. Open Gold Chest in tent.
- Set Waypoint to In Need of Tanning a Station. Head on over to Raven’s Keep.
- Go on in. They aren’t friendly! Once inside you’ll need to solve the puzzles.
- You’ll unlock the Fancy Stone Block.
- Reading the lore updates the location of the tanning station, so we can leave.
- Head to the Flame Shrine to the Northeast of Raven’s Keep. The way you get there is through the broken cell that goes into the ewok area. It goes upwards and will take you to wooden scaffolding that you use your grapple to get across. It’s a total pain, but worth the 3x sparks.
- The mountain to the Northwest has a huge Ewok colony and a mini-boss. That means lots of feathers. The way to get in? The Altar you set up outside of Pillars of Creation. Run South, and take the left tunnel upwards. There’s also a Night Sanctum in there and a second Flame Shrine on the south side of the mountain accessible through the colony network.
- Once you’re done with that, deactivate any temporary Flame Altar and head for Blacksmith’s Request.
- When you arrive, it’ll update to Trade Outpost Blazing Rock. Find the lore items and open the silver chest at the top. The letter you need to read is on the billboard toward the back of the settlement.
- The next phase will move to the east. First mark the Flame Shrine. Fly over to it from the top of the spire. First make sure The Blacksmith’s Request has moved into the shroud to the east. If it’s not there, you missed a lore read from the bottom area.
- Build your Flame Altar there. This is going to be a staging area for a few runs.

- Go to your base. Repair, load up on arrows, potions, food, rest, etc.
- Teleport back to the Island Altar. Mark The Blacksmith’s Request in the shroud below.
- Dive on down! Get the two lore updates and open the silver chest.
- The location changed north. Head on over!
- Go to the ruined town of Jasper Isles. On the west side, go into the tents, get the lore and read the note on the billboard before crossing the bridge; but look down to the southern side. You’ll see the Smithing Tools and a golden chest below on a ledge next to the lava. Jump down and claim your loot!
- Go back up and kill the root. It’s in one of the buildings. Use Explosive arrows to kill the group and spawns. Kill that root! It’s on the east side over the bridge. Nearby is a door you break down with a silver chest and some lore.
- Note a town named Pondsworth is to the north. If you visit, go down under the building to a silver chest that drops a Cursed Fishing Rod. Proceed to your waypoint.
- Teleport back to our Altar Island.
- Just to the east of the shrine we just got up on the small isle is a Elixir Well. You can see the towers sticking out of the mist. Fly on down and liberate it! This well is big and a doozie. It has a mini-boss. You can also shoot the root from where you can see it so it’s clear when you taken down the mini-boss.
- Teleport to base after root is gone. Repair. Place Smithing tools. Get new quests. Salvage. Deposit.
- Make sure you have a lot of Dried Fur going in the Drying Rack.
- Might need to mine more Copper Ore and Wood Logs to make Tar.
- Quick note, when you looted corrosive blood for the first time, it unlocked the Repair Kit at the hunter. These are very good to have with you if you have durability turned on. The Critter Glands are dropped by the flying bugs. Fur Patches are dropped by rats. Want to farm rats? Go to Harvest Homestead west of Springlands Spire.
- Time to get another well! See the Flame Shrine north of our island flame shrine? Mark it and go! Enter the cavern in the shroud. It’ll wind upwards. As soon as you leave the shroud and enter the Vuk area, take a left and it’s right there on the ledge.
- This is where you may see your first Shroud Stalker. Dodge its lunge, and kill it for its Petrified Shroud Stalker Shell.
- If you see shroud tentacles, kill them to get Shroud Adhesive.
- Next, mark the ??? to the north of you. Run to where you’re over it on the surface and then go west to a hole that goes down into the shroud. Dive on down! Go east to discover the Gem Forge.
- Once you find and mark the Gem Forge, recharge your time by standing next to it and follow the path out of the forge north until it comes to a main road. Take a right and head northeast.
- That’ll lead you right to the Elixir Well. This is another you can shoot with exploding arrows from a distance and complete. But there’s a silver chest and gold chest down there that’s worth looting.
- Spend those skill points!
- Climb out, and follow the path east, kill the tentacles and floating jellyfish and get their guts! Follow the road east and then northeast. It will lead you out of the shroud and by a Obelisk up on your left. Read it.
- Teleport back to base. Repair. Salvage. Deposit. Check food. Arrows.
- Craft a Flame Altar.
- Mark Vukah Encounter on your map. If you don’t have it, that’s fine. We’re going south and it’s the Vuk encampment on the east side of the mountain.
- Teleport to your island Altar. Go to the southwest edge. You’re going to glide down onto the lower slope of the plateau. Land on the lower area and make your way up and over to the south, all the way to the Vuk Camp. Liberate it and open the golden chest.
- Teleport back to the Flame Altar that was our temporary altar outside of Pillars of Creation. Deactivate it.
- Run towards Trade Outpost Blazing Rock.
- We’re setting up another Altar right next to a Tin Ore vein that’s down in the ground. Place your Flame Altar in the location seen below. Don’t make it too close to the crevice because the ore won’t respawn.

- Head down into the crevice, kill the critters, and mine some Tin Ore until your pickaxe breaks!
- When you’re done, go back up and teleport back to base.
- Technically you can build another Smelter by going back and getting another Crucible from the same place we did before, but I prefer waiting until we get the sand to make our own. So we’ll just use one Smelter for now.
- Toss all that Tin Ore with Charcoal and Wood Acid in your Smelter and get it going!
- Go ahead and throw 50 Clay and 50 Wood Logs into your Kiln so we have 50 Fired Brick when we’re ready to make our next smelter.
- There’s a chance you looted Leather from a night mob (the dog group). This would have unlocked the Large Backpack. If you can make it at the bard, do it. If not, we’ll be making it soon.
- The good news is the Bronze Bars will not only unlock our new armor set, but also Large Chests. But to make the Large Magic Chests, we need to Alchemy Station. We’ll get that soon!
- While the Tin does its thing, let’s go liberate two roots!
- Teleport to your Tin Mine Altar. To the southeast of the Vukah Camp you’ll see two ? with a Flame Shrine between them. Mark the ? to the left of the Flame Shrine. You can follow the path south. Run through the Rat Infested Outpost. Get those Fur Patches for Repair Kits! Keep following the road south. Shoot the giant jellyfish from above. READY EXPLODING ARROWS. Note the Root is on a ledge. Make sure you jump on to the ledge. When you land, blast everything and liberate that root!
- Mark the other root. Fly down and to the Northeast. Follow the path.
- You’ll come across a Shroud Stalker (to the right of the path). Kill it and get those juicy Petrified Shroud Stalker Shells. Always kill the stalkers and get their shells whenever you see them.
- Proceed to the root! You’ll reach the structures of the Smothering Pit. Follow the path upwards. You’re close when you have to grapple up.
- After killing the Fell mini-boss and cutting the root down, open the Golden Chest in the back!
- Teleport back home. Repair. Salvage. Deposit. Check Arrows.
- Your Tin Bars should be done. Time to make Bronze Bars! Start making as much as you can.
- Wait until the first batch of 10 Bronze Bars is done. When it’s done, make a Bronze Pickaxe. Now, go and mine more Copper Ore while we wait for the other bronze stacks to complete. You’ll easily get more than 100 copper ore in a single run with this new pickaxe; and quick, too!
- When you get back, the other stack should be done. Make a Bronze Axe.
- Now you can harvest wood much quicker than before.
- This is where you can start building with water. Bronze Bars unlocked the Water Dispenser, which can be placed anywhere on your base. Right now there’s no benefit to having water other than aesthetically. We’ll use it later on for crops. We also haven’t unlocked draining mechanisms, so your water dispenser can quickly turn the largest area into a grand lake. But have some fun! Check out how it works. Enshrouded has the best water physics and building of any survival game on the market.
- Time to get that Tanning Station up and running so we can make our new armor!
- Craft a Flame Altar.
- Teleport to the island altar. Deactivate it because we have the altar near the mine.
- Mark In need of a Tanning Station. Teleport to the Tin Ore Altar. We’re staying up top. Run southeast and along the north side of the ridge. To get to the island with the tanning station we need to cross a bridge, but it’s quite a run and we need to go upwards east of our destination. You’ll see the Vukah Outpost. There’s a fossil in it.
- Continue to follow the road east, and when it slopes upward to the north, you’ll see Dragon Bones. Note there’s a Gold Chest hidden north of the first rib at the bottom of an indentation in the terrain. Grab the loot and then Pickaxe 10 Fossilized Bone.
- When you’re done, keep following the road. You’ll see the Bounty Barn. Go into the field and loot the Straw and Wheat Grains!
- Note that acquiring Wheat Grains will now allow us to tame the Flightless Redtails running all around so we can farm Eggs.
- Place a Flame Altar in the field to the west of the barn.
- Note you’ll keep this Altar to farm Straw for future things.
- Run east and glide down into the desert sand. Note we’ll be using sand later for glass. Go ahead and pickaxe a load of 250 Sand. Note you want the reddish Sand, not the tan Fine Sand.
- Teleport back to your base. Repair. Salvage. Deposit.
- Select Fossilized Bone Dust at your Grinding Stones and put the 10 Fossilized Bone you just farmed.
- You might need to craft another magic storage chest by this time. If you’ve taken out the wandering dog caravans during the night, you probably have the resources to make a Large Magic Chest. If so, do that. If not, just make a medium.
- Now that you have sand, make another Crucible and Smelter! Granted we’ll be moving to Iron next, but until then, Bronze is our metal and we need to make a good amount of it.
- Let’s get that Tanning Station. Make sure you have arrows, food, etc.
- Teleport to the Altar by the Bounty Barn and head over the bridge!
- Infiltrate the keep, kill the blubbery mini-boss with explosive arrows, loot the gold chest and get the Tanning Station! Go back to your base and set that bad boy up! Start making some leather!
- Repair. Salvage. Deposit.
- Grab the Fossilized Bone Dust and go to your Seedbeds and begin making What Seedlings.
Phase II – New Armor, Skill Point and Strengthening the Flame
- Let’s talk about farming Ammonia Glands. If you recall, the red mushroom guys in the shroud drop them. But we need quite a few. Fear not! Umber Hollow, the shroud beneath where we had our temporary flame base is the place to do it.
- Teleport back to your Tin Mine Flame Altar. Run east and dive back down into Jasper Hollows, take out the root again (remember they regrow every 30 minutes) and start running around looking for them. Start by running north out of town.
- Another quick note. The red guys drop ammonia glands on the ground as you shoot them, so don’t just loot their corpse. Look at at ground they ran on once you started shooting them!
- Return to the cleared root area to recharge and teleport out when you have what you need.
- When you return the Blacksmith will probably have the Iron quest for you. Take it, but we won’t be doing that just yet.
- Let’s make our new Large Backpack! It takes 5 Leather and 5 Linen. More inventory is always better.
- Time to make our new Armor! It’s going to be a mix of Mercenary (Chest+Pants+Boots) from the Blacksmith and Sharpshooter (Helm+Gloves) from the Hunter. We’ll need:
- 18 Linen
- 18 Leather
- 7 Charcoal
- 10 Bronze Bars
- 10 Amber
- 6 Critter Glands
- 23 Mint Mushroom
- 5 Corrosive Blood
- 2 Indigo Plant
- 3 Straw
- 3 Shroud Gelatin
- 5 Resin
- 3 Ammonia Glands
- You should have everything you need. Make the new armor, equip it, and throw your old armor on a mannequin!
- New PR/MR is 198/114. Not too shabby!
- You should now also be able to make an Extraordinary Glider. Go for it!
- Spend any skill points.
- Put 20 clay in the Kiln. We’ll need some bricks.
- At this point I recommending having one Repair Kit on you at all times.
- Plant that Wheat as soon as it’s ready!
- Next, we’re going to Strengthen our Flame. We should already have the Fell Monstrosity Head. If not, don’t worry – you’ll get it below at the Cradle of Dusk. All we need are the support items. Rooibos is scattered all over the plans, you know how to get Ammonia Glands, Tin Ore, we already have enough Sparks, and the Mint Mushroom Meat is easy to get.
- What about Fossilized Bone? We’re going to get that shortly. First, it’s time to switch from Copper Arrows to Bronze Arrows. First use up all of your Copper Arrows, but when those are gone, start making Bronze Arrows. Now you can see why collecting all the Feathers you can is important.
- Time to liberate another root and well! Gotta keep those skill points coming in.
- Make sure you have arrows, are repaired, etc.
- Teleport to your Altar by Bounty Barn and head to the ? to the northwest. The way to get up there is on the west side. Climb on up and kill that root.
- Once it’s liberated, it’s time to get the Nomad Highlands Spire and Fossilized Bone. We have a Shroud Well due east of us, but it requires the next level of Altar to access.
- Mark The Blacksmith’s Family to the north of our Altar and run! The road takes us all the way there.
- You’ll arrive at Fanning Ranch. There’s lots of rats. Use your Eternal Ice Arrows to kill them and take their Fur Patches.
- The Blacksmith’s Daughter’s soul is in the rubble. Shoot the exploding barrels and collect her soul.
- Run to the spire! Take the main road then run into the east entrance. Complete the puzzles and register it.
- Teleport to base. Repair. Salvage. Deposit. Check arrows, etc.
- Talk to blacksmith. Summon Rochelle. Make bed. Get quests.
- Teleport back to the Nomad Highlands Spire. Go to the west side. See the big bone structure? There’s our Fossilized bone. Mark A Black Cauldron for the Alchemist on your waypoint and fly on down. Stop at the giant bones and dig up 20 Fossilized Bone.
- Continue to the quest, which starts in the little town of Rattlebleak. Go into the southeast building with the shroud coming out of the basement and head down the stairs. Read the lore. That’ll move the quest to the north. Get the Silver Chest.
- Teleport back to the spire, and fly to the second quest location. The Cradle of Dusk. WHOA UGLY! Miniboss. Easy kill with Frost Arrows from the crater edge. Just dodge the ranged attacks. There’s your cauldron!
- Run out of the Shroud and teleport back to base.
- Complete quest. Build and place the Alchemy Station.
- Time to Strengthen our Flame! Look at what you’re missing and go out and get it!
- Welcome to Flame Level 5! Things are moving along!
Phase III – Skills, The Collector, and Preparation for the Desert
Ready to get 9 Skill Points? Time to clear out some Wells and Roots! Then we’re going to faceroll the Hallowed Halls to get The Collector survivor. All to prepare for the sandy dry desert!

- Before you get started, start making 20 Fired Brick and make sure you have 5 Metal Sheets.
- I do the roots and wells in order from 1-5. 1-3 are roots, 4 and 5 are wells. Get those points! Feel free to grab the Sparks from the shrines as well.
- You’ll encounter your first red exploding bugs that drop sulfur. Be very carful; they pack a punch, but make sure you pick up that wonderful explosive. We need a lot of it for our new Explosive Arrows. You’ll also see Enshrouded Vultures. Kill every one you see to get their talons!
- The first well has a glowing red bug queen. Kill it with exploding arrows from a distance and loot all that juicy sulfur! We’ll be mining it later, but pick it up for now.
- When you’re done, return to base. Repair, Salvage, Deposit, check food, etc.
- Spend those skill points!
- Select Almanac of Plants and Seedlings for the Farmer. Teleport to your Tin Ore Altar. You’ll need to run south. Cross the big stone bridge. Welcome to Surat’s Rest!
- Start hitting all the lore books and keep moving toward Scavenger Arena. You can do the other quests if you’d like. Ends with the Matron. She drops the Almanac. Go down behind the Arena to open a Gold Chest and liberate the soul of Villager Gabrielle Fairburn.
- I also do Caravan Raid since it’s close and gives us a building component.
- If you want the Face Palette, run to the top of the rope hook next to the building. It looks like it won’t work, but it does. Jump up and glide into the broken lower area. It’ll put you on the roof. If that doesn’t work, then just pickaxe the hill behind it (to get up top) and jump from there to get it.
- You might also activate Nursery Supplies. Go up (southwest) one level and shoot the mound of dirt with the explosive. There ya go.
- Teleport home, place the almanac somewhere in the corner on the ground and talk to the ! NPCs.
- Go to the Farmer, craft an Oven and place it.
- Ready to get your next survivor, The Collector? We could have gotten him awhile ago, but he’s in the Hallow Halls, which is a very large multi-stage dungeon. It’s easier to do it overpowered. For this you’ll want at least 200 Explosive Arrows. Note there’s a repair station at the beginning of each section (near the restoration shrine).
- Select Explore the Hallow Halls west of your main base, teleport to the Springlands Spire and jump southwest. You can see the crypt entrance far in the distance up the mountain as a tall red structure. Go forth and destroy the undead. Make sure you pick up all the Ectoplasm Fragments that drop.
- Once it’s done, go back to your base. Summon Aiden Crawley, make a bed, assign, get quests from him and other NPCs.
- We’ll get his Ectoplasm Press later.
- Now is a great time to expand our base. We’ll need more room for crafting stations and beds for our survivors. It’s very easy in this game since there’s no building physics. I generally expand the base length wise by 2 on each end, so the little garden isn’t disturbed. Move the pillars out, and rebuild the roof. Keep it simple and open unless you want to build something more complex, but for this guide, the simple open approach works great.
- Once expanded, you can build and place some new comfort items as well.
- You can also take a break and go do some of the green/easy quests. You can also make the Coloring Station if you want to colorize your gear.
PART VI – Kindlewastes
Welcome to the desert! I love this biome. Pick up every Saffron plant you see! Also, this area has the best twig farm in the game. Once you get the Spire, just jump off and down and start harvesting from the desert brush. You’ll have 100+ twigs in under a minute.
Phase I – Spire and Iron
- Make sure you’re repaired, have food, potions, arrows, etc.
- Also make sure you have a TORCH.
- Deactivate the Altar at Pikemead’s Reach.
- Teleport to the Nomad Highlands Spire. Set Waypoint as Cosmetic Blacksmith Outfit. Fly down. Follow the grey path into the desert area, but before it goes into the cavern make a right and start jumping up the side of the hill to get higher and higher. Follow the waypoint guide.

- Note the yellow veins are Sulfur, the bluish veins are Lapislazuli.
- Go to the waypoint. Start pickaxing the sand and you’ll find the entrance and fall down inside the tomb.
- One side has a tomb with a weapon, the other side has the outfit. Grab ’em!
- Next stop. Tracing the Footsteps. Read lore in tent. Waypoint moved. Go to it.
- You’ll see the Hidden Temple. You can go in to get the Hand Drum quest item for the Bard.
- Wind your way up to the top.
- You’ll come upon the Vulture nests. The soul of Galen Yeager is in the topmost nest. The Draconian Bow is in the second nest. If it’s better than what you have, use it!
- Your next destination… the Kindlewastes Spire to the southeast! It’s a bit of a trek, but worth it. Jump down from the Vulture Nests and aim for the giant ribcages. Go right from the smoking encampment. You should land on a big path. Follow the path as it heads south to the Monolith. Read it then go into the nearby tent and read the Lore.
- Fly eastward and down to the lava river and go north on the west bank until you encounter a path that goes east into the shroud. Follow the path deep into the shroud. If you see Enshrouded Vultures, kill them and take their Enshrouded Vulture Talons. Do not take the first path to the right. Once you get deep in the shroud, a second small path will be on the right. Take that and it’ll lead you up and to the spire.
- Once you register the spire, go back to your base.
- Summon Galen Yager. Make bed. Assign. Take quests.
- Salvage. Deposit. Spend Skills. Check Arrows. Food.
- Mark Hearts of Iron as your waypoint. Teleport to the Kindlewastes Spire, and fly on down toward the waypoint. It’s in the shroud and there’s a juicy root with lots of bugs! Blow them all to hell!
- There’s multiple Iron nodes there. Mine Iron Ore until the vein is gone. Don’t worry, there’s better iron locations, but this will be our first haul.
- Teleport back to your base and start smelting that iron!
- Iron Bars unlock the Drains for managing water levels. This allows the player to control the flow so to speak.
- While that’s doing its thing, let’s get the Elixir Well to the southeast of the Kindlewastes Spire. Teleport on over, and fly south/southeast and down into the shroud to liberate it.
- Looks like it’s plugged up! Pickaxe through that stuff.
- This Elixir Well is a nightmare with level 27 enemies. The root is at the bottom behind the rubble with all the explosives.
- That and we have mob down here that’s one tough miniboss. A Fell Sicklescythe. He throws shuriken’s and a skull torpedo that can 1-shot you. When he throws the shuriken, switch to a melee weapon and block them with your shield. When he charges up to cast the skull, use your blink to move sideways. Use Iron Arrows on him. Because of the close quarters it’s a bit rough of a fight, but doable at our level. Killing him will give us the head we need for our flame upgrade and also materials for our new armor set. Don’t forget to grab the Gold Chest up top!
- Teleport back to the spire and fly back to the Well. But this time, run south! There’s a root in there. While you’re running, farm Mushrooms and get 40 Brittle Shroud Flakes.
- See that bridge that runs north/south? Follow it. The Root is at the south end at Low Tide. You can shoot it, but if you go through the cavern it wraps up and there’s a gold chest up the climbable wall near the root.
- Once the root is gone, teleport back to base. Repair. Salvage. Deposit. Check Arrows. Food.
- Make your Iron Pickaxe and Iron Axe! Delete the old ones.
- Craft and have a Flame Altar in your inventory.
- The below map shows the order we’re going to do the next few steps.

- Teleport to Kindlewaste Spire. Jump off the northeast corner and fly toward the large cavern in the hill below, south of the shroud and behind the ruins. As you get closer and fly to the right into the large cavern, you’ll see two torches. Land there. Run up to register the Sun Temple. Purge the evil! There’s two Gold Chests in the temple. Note this is a great place to farm Fell Hearts.
- Teleport back to the Spire. Next we’re going to get the Elixir Well in the shroud to the north, northeast. Dive down and liberate the well! It also has a Gold Chest at the end.
- Teleport back to the Spire. Fly Northwest down into the shroud to take the Cavern upwards to Rose Shell Burrow. Go in and loot all the Saffron you can!
- Next, run head east, northeast. Don’t go into the Shroud. You’ll come across a blue Cave Passage. Run through it. See the Iron Ore veins? That’s our new mining spot! But keep running up and exit. If you came from the west and arrived at East Lapis, follow the path south and it’ll take you to the cavern entrance. Put down a Flame Altar outside of the exit.
- Run in and load up on Iron Ore. There’s about 50 in each vein. Note you can go to the first place we went (Ridgeback Mine), but that means you have to fight everything and kill the root before you can mine. I find this easier. Just load up, run out, and teleport back to base. The ore vein will regenerate in 30 minutes.
- Teleport back to base.
- We need 128 Linen to make our next armor set. Don’t use the Hand Spindle. Instead make sure you have enough flax and linen to for 128 at a 1:1 ratio. If not, start planting. We’ll also need 16 leather.
- Select Loom for the Hunter. Teleport back to our new Iron Mine Altar.
- Enter East Lapis. Run across the bridge, go in building to the left, turn left and right, go down the stairs. Voila! One Loom for the looting. I recommend getting the Lost Villager Soul quest from the upper level of the building the loom is in. The destination is in a house on the west side of East Lapis. There’s also a color palette at the top of one of the buildings.
- Teleport back to your base. Place the Loom. Talk to Hunter.
- You can now also craft the Spinning Wheel. This makes Linen at a 1:1 ratio from Flax rather than 2:1. Craft one and start making that Linen!
- Place any of the villagers we rescued that you haven’t already placed. Talk to them. Make and assign beds. Get their quests.
- Repair. Salvage. Deposit.
- While we’re not ready to upgrade our flame or make our next tier of armor yet, here’s a quick overview of where you can find key components we’ll need. Fell Hearts come from the Fell Sporeheads. You can farm them at the Sun Temple just east northeast of the Kindlewastes Spire. You can also go to the “Far Away Fray” Tavern northwest of the spire. Directly north of the tavern icon is a temple that has shroud outside of the entrance. The Haunted Sun Temple. Go inside and two of them buggers are in the room to the right. More are deeper in the temple, along with another Sicklescythe boss. If you wan to complete the temple, it drops the legendary sword Nova. Shroud Sand can be mined from the red looking eruptions in the grounds of the Kindlewaste shroud. Scales drop from Scorpions and Sand Diggers, the guys that look like Armadillos. You can find them in the desert just west of the Kindlewaste Spire on the other side of the shroud.
- You can also look at the requirements for strengthening the flame. We need a lot more sparks, and Saffron (the pink and purple plant in the desert).
- We have a lot to do. Quests. Farming. Getting sparks (each shrine gives x4 in the wastes). Managing the crafting of resources to make our armor set, iron arrows, etc. Now’s probably a good time to expand the size of your farm because you’ll want to be planting things to support more advanced food, etc.
- Start 40 Fired Brick in your Kiln and make sure you have 10 Copper Bars, 13 Glass and 10 Bronze Bars. If you need glass, you can make it with Sand and Charcoal at the Smelter.

- While things are cooking away, it’s time to do Scientific Instruments for a Laboratory. Mark it, teleport to the Kindlewastes Spire and glide north northwest to the waypoint.
- Read the note in the tent. If you didn’t get it before, go to the Obelisk and read it. We’re going to do a few other quests on our way to the scientific instruments.
- Mark A Beehive Smoker and run/glide down to it. But when you reach the bottom shroud and the path, make a left and go to the Caravan quest. There’s tents there with bats. Kill the bats and read the two lores.
- Resume Beehive Smoker. One of the music sheets is on the upper deck.
- Read the notice on the board outside the tavern on the bottom level. It’ll update the location. Go inside, open the silver chest. Read note. Locations updated!
- Let’s go get the Scattered Cosmetic Hunter Items. This is a fun one because the shooting scavengers drop the cosmetic items. Note there’s only 4 pieces; no gloves. Not sure why. But it’s alright. Collect the set and now you’re a stylin’ hunter!
- Let’s get back to hunting those Scientific Instruments. Take the northern road out of town, then the second right branch (to the north). Left at the T then right in the light shroud to discover the Eldermere Dam Excavation Camp. The tools are to the right up the sloped ledge in a buzzard nest.
- Before we head back let’s the the flame shrine to the east. It’s nestled in the big cliffside structure. Enjoy the view!
- Teleport back to your base. Build the Laboratory. We’ve now unlocked Black Powder, which is used for Explosive Arrow II, but each takes 7 Nitrate, 1 Sulfur and 2 Coal Powder. You can now see the manufacturing requirements to sustain the next level of Explosive Arrow II and why we didn’t b-line for it. And each batch of 25 takes 5 black powder.
- One of the best ways I’ve found to get Black Powder is to hunt the wandering dog scavenger groups at night on the roads in the Kindlewastes. They can drop it.
- Ultimately, you can switch to Explosive Arrow II when you’re ready. It requires planning and a good amount of resources to sustain.
- Quick note. I don’t really use EA2. It’s just not worth the cost. EA1 does everything we need all the way to current endgame. But you can try it out for yourself and see if you think it’s worth the material requirements.
- Now it’s time to focus on our new armor! Soldier (Chest, Legs, Boots) and Deerstalker (Helm, Gloves). The Hunter makes the Padding with Fabric, Leather, Resin and Linen. To make the armor, we need:
- 4 Lapislazuli
- 16 Padding
- 20 Charcoal
- 11 Iron Bars
- 3 Fell Heart
- 25 Shroud Sand
- 1 Mist of a Fell Sicklescythe
- 20 Scales
- 2 Enshrouded Vulture Talon
- The 16 Padding requires:
- 48 Fabric
- 16 Leather
- 32 Resin
- 32 Linen
- Note you should already have several Padding from killing the nighttime wandering dog scavenger groups in Kindlewastes. If you don’t have all the materials, get what you need and start the manufacturing process.
- While it’s doing its thing, go out and complete A Beehive Smoker. Teleport to your Iron Ore Altar. Grab the spark, and you can stop by and get the Music Sheet and Minstral Hat on your way.
- The mini-boss drops the Bee Smoker. Don’t forget to get your spark from the Flame Shrine.
- Teleport back to base, repair, salvage, deposit, place the smoker anywhere around your base, and make your first bee’s nest! They make Honey and Wax.
- If you haven’t made your armor by now, focus on that. New PR/MR is 247/143 and you have a flowing cape! We’re getting a step closer to being a true badass!
- Our Journal is full of quests, but let’s go get more skill points!
- Let’s destroy a Shroud Root that’s south southeast of the Iron Mine Altar. Head on down and you’ll find it at Sleeping Sands.
- Teleport to the Kindlewastes Spire. There’s another root just west in the shroud. Fly on down and kill it with fury! Note the Tricorn Cosmetic Hat is under a nearby rubble building in a silver chest.
- Teleport back to the Spire. Mark the Flame Shrine of Manathor which is far south from the spire. Fly toward it and you should be able to land in Shorewatch. Reach the shrine and get your 4 sparks.
- Teleport back to the Spire and fly to Shorewatch again. This time, follow the road west/southwest out of town. Once the road reaches the Shroud, don’t go in – instead hang southwest. You’ll come to the edge of a shroud basin. Fly down to The Grim. he root should be very apparent. Once the root is down, we’re done getting skill points for this biome! Don’t forget to jump down and get the Golden Chest.
- We can’t do The Greatest Game yet because it requires our Flame to be level 6. We’ll be upgrading soon.
- Teleport back to base. Repair. Salvage. Deposit.
- This is the time I make two Huge Magic Chests. But we need to unlock Enshrouded Oil. To do this, go to your Grinding Stones and select Coal Powder. Start grinding that goodness up! We just need 10.
- Before we upgrade our flame, we need to get the Ectoplasm Press from the second Hollow Halls followed by the assistant from the quests Helping Hands.
- Make sure you have at least 250 Explosive Arrows for Hallow Halls. Also, craft the Revelwood Bone Key from The Collector and have it on your character.
- Select the Ectoplasm Press for the Collector quest. Go to the Hallow Halls, west of the Revelwood Spire. To get there, pass by where you got the spindle, then go west into the shroud before emerging from it on the southwest side. Even being over leveled for the halls, the endgame boss can easily kill us. Use your blink and stay as far away from him as possible. We need 120 Ectoplasm Fragments to make the Press, so loot everything!
- Finish halls. Go back to base, craft the Ectoplasm Press. Take quests.
- Complete Helping Hands in Blackmire. It’s one of my most hated quests because of the absurd puzzles. Welcome to super mario meets jungle jumper misery. In the first temple, the silver chest and scroll are behind a secret door on the lower level. In the second temple, you can skip the lower area by flying into a top entrance. The soul is at the third temple at the top of the middle spire.
- Summon Assistant Aunt Braelyn and Villager Gabrielle Fairburn. Make bed, assign, and get quests.
- Now it’s time to focus on upgrading our flame.
- Remember, Sparks regenerate every 30 minutes. There’s one just east of our Iron Ore altar. Grabbing it awards 4. There’s also one just north of the Kindlewastes Spire you can glide down and straight to.
- Farm some Yucca Fruit while you’re out and about. There’s a grove of them just north of the spire and east of the flame. You get them by cutting down the yucca trees that are scattered about the desert.
- Need Saffron? Head back to Rose Shell Burrow. Then you can go over to Sunsimmer Souterrain.The location is below. You can also run north of weaver’s cottage. A fair amount grows in the canyon.

- If you want to grow your own, you can create a new plot of Fertilized Farm Soil and plant seedlings!
- If you need to find the Fell Draconian Vultures for their talons, below is a good place to look!

When you’ve upgraded your Altar, we don’t get new quests just yet. Now is a good time to do the green quests you find interesting or are related to cosmetics you want to secure.
Also note if you want to put up to level 30 gems in your weapons, you need to gather Level 25 Archaic Essence. Below shows the location of the Shroud Lair and the Kindlewastes Gem Forge. Note that Lair is VERY complex and hard to get out of. Make sure you take anything that increases your shroud time and repair kits as well. You’ll need them.
One thing you can do is socket your bow with a Gem of Hopeful Embers, which can keep you in the shroud indefinitely as long as you’re killing targets.
PART VII – Albaneve Summits
Ready for the snowy yet very large and adventurous biome? Before we start, make sure all exploration altars are disassembled except for your Iron Ore one.
Also, be wary of the blue creeping slime in Summit shrouded areas. You’ll see it creeping along making a squishy sound, glowing blue and heading for you. It can be very annoying when trying to farm Silver Ore. Explosives will kill it.
Phase I – Entering the Summit
- Craft an Altar and have it in your inventory.
- Queue up 5 Dried Purple Berries in your Drying Rack. You can switch to Vegetable Puree if you want ranged damage with stamina regeneration. Also make 5 Flatbread. We’ll need it for our Yak Food Bait.
- To start the process of going northbound, we need to complete the quest Among the Bluejays. But to get that quest, we need to complete Sun Temple Stories. Mark the Haunted Sun Temple and make your way there. Kill the evil Fell Sicklescythe, open the gold coffin and teleport back to the base. The Alchemist will have the quest.
- Activate Among the Bluejays. Teleport to the Kindlewastes Spire and fly south to Scatterbone. I land on the spine of the fossilized dragon carcass and run to the tower. You’ll need to kill two Matrons and their lackeys. To enter shoot the 2 buttons on either side of the temple, and the 3rd is opposite of the entry door up top. Once inside you’ll need to locate four buttons. They’re hidden around. One’s behind a bookshelf. The other is shot through a slit in the middle column. Another is shot above, and another outside on a porch. The glider is at the top in a Golden Chest.
- Make sure you also collect the soul of Hugo Vanderhall on one of the porches.
- When you get the Ghost Glider, equip it and delete the old one.
- Teleport back to base.
- Talk to the flame. Talk to Balthazar. Place Hugo, assign him a bed.
- Repair. Salvage. Deposit. Check Arrows. You want 200 Iron and 200 Exploding.
- Craft a Flame Altar and have it in your inventory.
- You now have two quests in the new biome! Select Ignite the Snowy Mountaintops. Teleport to your Iron Ore Altar and head north!
- Enter the passage to the Albaneve Summits.
- At The Pit follow the path to the right through the shroud and upwards while staying north. There’s other branches of the path. Don’t take those. If you enter the bug room, you went too far right. If you start going down you went too far left. Stay north.
- Keep following the path upwards out of the cave. You’ll pass a structure with skeletons on your right. Follow the path, and it will lead you past a resurrection shrine.
- Liberate Gateway Outpost “Drifa”. Kill Scavenger mini-boss. Go up tower. Liberate the soul in the cage. Open Gold Chest at top.
- Resume your journey towards the spire by following the path.
- Build an Altar to save your progress, teleport back to base and repair. Anton Godwin is the new soul. Place him and take his quest. Assign bed.
- Go back, deactivate temporary Altar and resume. Grab any Wolfsbane plants you see..
- Arrive at Balefire Garrison “Silkfrost”.
- Get to the top and light the Balefire. From there you can see the path that leads to the spire. We’ll be resuming our hiking trek.
- Go back the way you came and take the small left path to the lookout point (end of path) facing the spire, and leap with your new glider! You’ll experience your first natural updraft.
- Careful of the flying white wisps. Like the purple ones in Blackmire, they’ll follow, multiply and dive bomb you.
- Clear out the camp of baddies and continue.
- Cut down a few trees to get 20 Conifer Logs.
- Arrive at the spire and complete it! You’re going to love the ice… And the second level – you jump into the updraft coming off the lava to fly up.
- When you register the spire, you’ll notice you get Impending Hypothermia when you go out onto the ledge.
- Hypothermia is the new cold biome mechanic. It functions similar to the shroud resistance, except the amount of time you can survive is based on your frost resistance. Food, Armor and Rings can adjust the time. Once you get the full armor set, that’ll give you 15 minutes survival before you need to warm near a flame.
- Each Frost Resistance point translates to 1m30s of survival. In the beginning, we can get +6 with the Pocket Heater, Grilled Fatty Meat and Beef Stew. But we don’t need frost resistance until we start going at the height of the spire or above.
- Teleport back to your base. Take the quests.
- You should have gotten some Fatty Meat drops. Start cooking those.
- A new bait is available to us as well. Yak Food Bait. We can start our own Yak Farm! We need them for wool. While you can hunt them, you get more wool by having them on your farm.
- But we need Frizzy Milk, which comes from the Frizzy Goats in the mountains. We actually need to farm that because it helps make frost resistance food we need. Get two of them.
- The Hunter can also craft Pocket Heaters. They take Metal Sheets, Reptile Leather, and Coal, which is scattered around the summit.
- Make some Goat Food Bait and Yak Food Bait. Go into the mountains below the Spire on the path and to the east to get yourself 2 Frizzy Goats and 2 Yaks. Take them back to your base and get your new pets set up.
- I recommend making 3 beds for the Yaks because we want more than just 2. Having an extra empty bed for a tamed pair of animals will allow for a baby to be born that you can upgrade. Ultimately we want at least 4 Yaks generating Wool for us.
- Now is a good time to expand your base to include large animal pens.
- Let’s start activities that don’t require any frost resistance.
- Go to the Shroud Well southwest of the Summit Spire and liberate it. There’s a gold chest under the wood deck near where the root was.
- Go back to the spire. If you jump off the south side and fly down just south southeast, you’ll see a crumbling stone bridge. As you fly down, you’ll see a large vein of Obsidian on the south side of the mountain. Stop and mine until your pickaxe breaks. It should net you around 90 for armor and arrows.
- Next, fly down a land on the north side of the crumbling bridge. Go into the cave. That’s a Gold Chest spawn. Exit the cave, jump down and to the left (southeast) to the bottom of the small valley. There’s another cave on the left (north side) that has spiders and another Gold Chest. Get that juicy loot!
- Teleport back home.
- To start crafting the next level of armor, we’ll need:
- Coal
- Obsidian
- Amethyst
- Silver
- Wool (Raw Wool)
- Steel (Coal + Iron)
- But before that, we need to unlock the Wool and Blast Furnace. Let’s focus on those two first!
- Take any quests that are showing.
- Now you can craft a Spinning Machine at the Hunter. Just pick up your existing wheel and use that. If you need more Conifer Wood, just jump off the south side of the summit spire and land on the north slope of the mountain to the south.
- When you craft the spinning machine, unless you have acquired Raw Wool from your Yak, there won’t initially be any recipes. It takes 20 Raw Wool to make 15 Wool.
- You can also farm wool from the night scavenger groups that walk along the roads.
- We can switch over to Obsidian Arrows now, which are very easy to make because they just take obsidian, feathers and twigs.
- It’s time to prepare for our venture into the frigid cold. To do this, we need:
- Beef Stew
- Pumpkin Soup
- That’ll give us 6 Frost Resistance, which is 9 minutes of time. Let’s get what we need to make both.
- Teleport to the Summit Spire. Jump off the west side and glide down to the northwest side of the quarry. The town of Rothstep will come into view. The upper level has a flowerbed with 2 Gentian and 3 Wolfsbane.
- The soul of Oscar Godwyn is inside the building with the miniboss.
- Fly out of Rothstep to the southwest. We’re going to Vinebrook Farm, which has lots of Pumpkins.
- You can also grab the Hollow’s Eve Pumpkin, which is a decoration.
- Teleport back to your base. Place the Pumpkin decoration.
- Start making 20 Fired Brick in your Kiln.
- Go to your Farmer and make 1 Pumpkin Soup. Don’t eat it yet.
- Time to farm some Gentian.
- The below map shows the two spots where you’ll find patches of Gentian. Note there’s sparse occasions of the plant as you follow the path up the mountainside by the frozen river before you get too high for Hypothermia. You should be able to gather at least 6-8 from these locations.

- Teleport back to base and start the seeds for Gentian. Each group of 5 takes 7m30s, so it’s going to be awhile before the seeds are ready. Repair and make sure you’re prepared for adventure!
- Make an Altar and have it in your inventory.
- Time to mark our waypoint for A Blast Furnace for the Blacksmith.
- Teleport to the Summit Spire. Eat your Grilled Fatty Meat and Pumpkin Soup. Jump off the east side and follow the path that goes up into the mountains next to the frozen river.
- When the freezing cold begins, you have a little over 3 minutes to warm back up. If the timer gets low, just seek a nearby fire.
- Keep on the path and once you arrive at the top, go through the gate and follow the path into the shroud. It’ll lead you out of the shroud and to the second gate. Go through it. That’s Gateway Outpost “Alba”. Keep going up the path. You’ll arrive at the Forge of Obsidia.
- Place the Altar outside of the Forge. Note many people use the Forge to mine Iron and Silver.
- Head inside and warm up! Kill everything! The mini-boss drops the Bellows.
- Teleport back to base. Repair, Salvage, Deposit, check arrows, etc.
- Let’s kill the Cyclops! He’s directly east of the forge at the Gathering the Wool quest. To get there, jump off the east side of the spire. Glide around to the east side of the mountain that has the frozen river we can see from the spire; you’ll come across a cave. Land in the cave and keep running. You’ll pass a house. Smoke will rise from a small bandit camp. Kill them and read the lore in the tent. Keep going. Our destination is the Quiet Caves. The Cyclops is pretty easy as a ranger. Use Obsidian Arrows and open the gold chest.
- Notice how many Yaks are in the Quiet Caves? That’s a good place to come and get more! I recommend having at least 2 Yaks, but 4 is good, too. It’s just more upkeep the more you have.
- Teleport back to base! Talk to your Blacksmith and craft a Blast Furnace.
- I created the below map to provide everything you need outside of the Hypothermia areas. Note I generally drop an Altar up by the Amethyst and Iron cave to the northest, next to the house.

Phase II – Crafting our Endgame Armor
What a journey! Let’s get some new armor!
- Start your Gentian garden! Make sure you get it going over the next few hours. Always have a good amount growing while you queue up enough for food and the 40 necessary to update your flame.
- For our first set of 20 steel bars, we need 20 Iron Ore and 50 Coal.
- Head on out. Get 150 Coal and 60 Iron!
- Once your first load of Steel is done, you want to make a Steel Pickaxe and Steel Axe.
- Time to prepare for our new endgame armor set!
- To unlock Hardened Leather and Violet Fabric, we need to do the quest Alchemic Wisdom. Chitin powder is made at the Grinding Stones and takes Critter Carapace, which drops off high level flying and exploding bugs.
- Teleport to Summit Spire. Go and complete Alchemic Wisdom. Fly to and land on top of the tower sticking out of the Shroud. On the top level room is a picture wall hanging you can pick up. The waypoint changed. You can pickaxe to the Silver Chest buried next to the rubble. Run back up, get out of shroud. Teleport back to summit spire. Fly to the Vulture Nest in the northwest part of the Marble Quarry. Grab the wall hanging out of nest.
- Teleport back to base. Go to Alchemist. Craft the Alchemist Showcase. Put it on a wall and mount the pieces!
- The only thing we haven’t unlocked is Shroud Vapor, which requires Shroud Ice to make. This is easy to get but visually weird. Teleport to the Summit Spire and go into the shroud area just southeast of the tower so you won’t deal with Hypothermia. You’ll see these dark tan coral looking things but they turn into mushrooms further in (the big ones give the most). Chop them with your shiny steel axe and voila! We need 160 Shroud Ice.
- Teleport back to the spire. Mark To gaze into the void as your active quest, fly straight to it. Go down and you’ll unlock the Shroud Lair. At the bottom is a Sicklescythe mini-boss. Kill him and complete the quest. Get out of there, but grab as much Archaic Essence as you can because you’ll need the stuff to raise your gem of choice to level 33.
- Get out of the shroud and teleport back to the spire.
- Where do we go to spend all of that juicy essence? The Gem Forge is just to the southwest of the Silkfrost Garrison, down in the shroud through a small cave on the southwest side of the cliff. You can head there anytime you want if you need to upgrade or set a gem.
- Let’s get the root in the shroud to the southeast of the Shroud Lair we just liberated. It has a Fel Monstrosity that’s a lot of fun to shoot. Jump off the spire and glide Southeast towards the tower that had the Alchemist quest. But we’re going to land on the land mass that’s sticking up before the tower. The root is right below. Kill it!
- Teleport back to base and make 1 Shroud Vapor at the Laboratory. You’ll also need 14 wax. Make it at beehives if you don’t have enough.
- Don’t forget to start your Gentian Garden!
- You’ll need 51 Fabric and 68 Wool to make the 17 Warm Padding. You’ll also need 50 Critter Carapace to make the 50 Chitin Powder. Just fly down to the Elixir Well southwest of the Albaneve Spire and farm the buggers there.
- We’re only taking the Mountain Shadow Chest from the Blacksmith. The rest we’re getting from the Ranger. Alpine Antler Helm, Trailblazer Gloves, Trailblazer Trousers, and Frostbite Slasher Boots. For the whole set, you need:
- 11 Obsidian
- 6 Coal
- 17 Warm Padding (51 Fabric, 17 Leather, 68 Wool)
- 6 Steel Bars
- 150 Enshrouded Ice
- 6 Amythest
- 7 Hardened Leather (1 leather, 2 wax each)
- 1 Violet Fabric (Mauveine made at laboratory)
- 2 Leather
- 50 Chitin Powder
- Quick note – hunting the dog-led scavenger groups along the roads at night is one of the best way to cut down on the resource costs because they can drop steel bars, warm padding and other very expensive items. If you don’t have all of the materials, I recommend a nightly road session to see what goodies you can come up with! I’ve gotten 6 warm padding from just one group…
- Once our new armor is done, we’re at 355/248 PR/MR. Good stuff!
- If we can find an Avalanche Starter Legendary Bow or Forsaken Legendary Bow and two Rings of the Ancients that’d be fantastic.
- With our new armor set, we now have natural cold resistance that lasts 18 minutes, and that’s without food! With food, it’s 26 minutes. We can now explore the deep, cold north! And that’s a LOT to see in this zone.
- Ready to do the 3-stage Shroud Well Quest and get a ton of skill points?
- Make sure you have 200 Explosive Arrows and 200 Steel Arrows. Good food and healing potions.
- The well is just west of the Forge of Obsidia Altar. It’s very easy to get into, but you’ll be using a LOT of exploding arrows (Tier I is fine). It’s a bit complex to get to the first root, so I’m including a video below. The final boss is the Fell Cyclops, which will give us the item we need to upgrade our flame to Level 7!
- You should be able to craft Eternal Frost Arrow II at the Hunter. Just get 25 Ice, 15 Steel Bars, and 1 Enshrouded Cyclops Eye and you’re good to go!
Phase III – Upgrading our Flame & Exploring the Summit
We already have the Cyclops Head and tons of Granite, so we need to focus on other components for upgrading our flame. Namely: Sparks, Wool, Gentian, Ice and Flammable Goo (made at Laboratory). Get the Gentian going at your farm (plant and grow). Your Yaks should passively be generating Raw Wool (plus you can farm the wandering groups on roads at night for it). Mine the ice from any frozen water. As for sparks, it’s easier to just gather them from the Kindlewastes for now because we need to go deep into the mountains to get the summit shrines. No need to craft Flammable Goo! Those flamethrower bandits we’ve seen all around drop it left and right, so just start raiding every bandit camp you can. You’ll find all you need.
While all of this is going on (usually growing Gentian) I touch up my base. Build a few new Huge Magic Chests, rearrange things, etc.
When you’ve updated your flame to Level 7 let’s continue our exploration!
- Make sure you have an extra Altar on you! Have Beef Stew and Pumpkin Soup ready.
- Select Hollow Eve’s Decor as your next waypoint. Teleport to your Forge of Obsidia Altar, and make your way through the forge and up the snowy path to the west. You’ll reach a wall ledge. You want to go into the cave entrance to your right. Stay north. When you exit the cave, follow the path. You’ll come across Gateway Outpost “Bora”. You should already have the Royal Decree quest.
- Run to the very top and place your Altar above the outpost. The Royal Decree quest item is in a bird’s nest at the top of the scaffolding and over broken bridges.
- Mark and fly toward the next step of Hollow’s Eve Decor. Land near the little Hobbit House and collect the Pumpkin.
- Teleport back to your Bora Altar, and fly to the final Hallow’s Eve Decor location. Go inside the Hobbit house and get the Pumpkin!
- Teleport back to your base and get those Pumpkin Decorations placed!
You have two active region quests. One is to kill more of the cyclops and the other is to light the balefires and slay the corrupted beast (which is the final boss fight). The Summit is more about exploration and getting quests by going to new places that being directed to any specific place. You can’t raise your flame to the final level of 8 without killing the boss. You also have the Jester Hat quest, and the Gem of Bloodlust quest.
But there are nearly 30 quests in total within the summit region. All the others are triggered by exploring and reading lore.
- Make sure you plant enough Wolfsbane to have 50 to upgrade our flame!
- Teleport to your Bora Altar and follow the path south. Welcome to Everfrore Keep! It’s quite big and has a lot of baddies.
- Time to gather the 8 pieces of the Flame Mosaic. This quest is optional, but it sure gives a great tour of the keep.
- Once you have all 8 pieces, teleport back to base, talk to the Carpenter and craft the Flame Mosaic Showcase under Decorative – Collections.
- Repair. Salvage. Deposit. Check food and arrows.
- Build an Altar and have it in your inventory.
- Teleport to the “Bora” outpost.
- Look out West. See the red lights shooting into the sky? Those are Balefires we need to light.
- Fly to the Northwest one first. Outpost “Wynward”. They have a bit of a Drake problem.
- The soul of Gunther is inside the first building. Grab him. Read the book.
- Teleport back to the “Bora” outpost.
- Fly to the red light due west to Balefire “1000 miles”. Light it.
- Teleport back to “Bora”.
- The next fire is southwest. Go up a bit using your grapple. You’ll have a clear view over the wall. Glide on over to “White Pine”. Light the fire.
- If you haven’t done “Rimerock” or “Silkfrost” do those.
- Go back. Repair. Salvage. Deposit. Check Arrows and food.
- Teleport back to “Bora”. Now it’s time for us to get a northern facing position. Head north, use the grapple and follow the ridge around the peak.
- Place your Altar on the north ledge of the peak near the Shrine. You should see one beam below you and another northeast. There’s also a Flame Shrine up there.
- Jump down and get the Balefire below you at “Iron Heart”.
- Next go to the Eastern one at “Lance Point”. The dragon will arise! And you’ll see the Slaying the Corrupted Beast quest.
Phase IV – Weapon Farming & Preparing for the Boss
Before we fight the boss, we should try and get our Legendary Avalanche Starter or Forsaken Bow. With the latest patch, Gold Chests regenerate every 30 minutes. Teleport to your new North Peak Altar. We’re going to Hollow Halls. You can fly straight to it from the north face. The good news is the summit Hollow Halls is a single chamber with a ton of monsters, so have your exploding arrows ready to go.

Let’s take care of the Elixir Well northwest of our “Dora” outpost. Just fly there. A juicy Cyclops awaits! Next let’s do the Shroud Root deep in the cave of the Camellia Lake Marble Quarry. You want to go into the western most entrance of the quarry. There’s a Golden Chest visible from where the root is.
There is a sort of “cheat” for the Summit Hallow Halls. You can put an altar in the halls just out of range of the golden chest and the side chests and just reload the game. The chest will regenerate, but the monsters won’t. However, I recommend keeping the monsters spawning because they’re some of the best XP in the game. Plus you can just bunch them up behind the door and it only takes around 30-40 exploding arrows.
There’s 3 roots left. We can’t do them until we upgrade our Flame to level 8, and we can’t upgrade our flame to Level 8 until we kill the dragon.
Phase V – Albaneve Dragon Boss Fight
I’ve prepared a video below for those who are new to the fight. There are a few ways to cheese it as well, which includes going to certain ledges where he can’t attack and just hammering him with arrows nonstop.
To prepare for the fight, I recommend the following:
- 300 Steel Arrows
- 100 Stun Arrows
- If you need to farm Critter Parts, go to the Ancient Vault of the Carpenter and the bug room. Let the spawners spew nonstop and you’ll be swimming in good!
- 10 Greater Health Potion
- Food:
- Strawberry Cake
- Pumpkin Soup
- Frizzy Goat Milk
- Paw’s Touch Pet Buff
- Elixir Buff (damage)
- Fully Rested
- All items repaired
To get to the point where you set up your base, you must get to the top of Evermore Keep. It’s quite the journey, and if the Gem of Bloodlust hasn’t dropped yet, it should as you approach the summit. As you get above Evermore, it’ll turn a bit green and warm. You’ll arrive at a grapple point – you want to swing and grapple up on the ledge. You’ll arrive at the Cyclops Lair. Kill Mr. Ugly and continue up up up! When you arrive at the summit and resurrection point, run back down into the cave until you can place your Altar. You’ll see the big bad dragon flying in the sky up ahead. Go and kill him!
Phase VI – Upgrading the Altar & Cleaning our Quest Log
Time to get our Altar to Level 8 so we can go to the new water expansion zone! We need:
- 50 Sparks
- 50 Obsidian
- 50 Silver Bars
- 50 Mauveine
- 50 Tar
- 10 Shroud Vapor
- 80 Enshrouded Ice
- 130 Active Mycelium
- 210 Salt
- 10 Nitrate
- 10 Shroud Sand
- 2 Wood Acid
- 2 Salt
- 10 Sand
- 10 Sulfur
- 50 Wolfsbane
- 50 Amethyst
- Fell Dragon Youngling Head
If you scroll up under Phase I you can find 3 Silver Veins. There’s also a vein in the Forge of Obsidia. Crafting 10 Shroud Vapor is the most time intensive, so focus on that. Wolfsbane grows throughout the snowy region, so you can easily farm it. Everything other than the Silver Bars and Mauveine is pretty easy to get. To get Active Mycelium I just fly down to the Elixir Well by my base. Make it happen!
Now is also a good time to clean-up some of your placed Altars. We don’t need most of them anymore as we prepare to enter the new region. That and our current glider with updraft lets us use the spires much more efficiently than before. Just make sure you keep your Iron Ore Altar because we’ll need to make Iron Dust later on.
This is also a great time to expand your base, plant new fields, and clean up your quest log. Run the Highlands Hollow Halls. Get additional color palettes. Get a second cat! You can complete the Skeleton Cyclops Collection. There’s plenty to do if you’re waiting for Wolfsbane to grow or Mauveine to craft.
Once our flame is upgraded, we can go to the new region!
Part VIII – Veilwater Basin
Once your Altar Flame is level 8, it’s time to go to the new biome! But first, I want to include this video that covers all of the new features of the expansion.
Take the Emerald Shores and Sanguine Sea quest and mark it as active. Craft a Flame Altar and have it in your inventory before you teleport to the Albaneve Summits Spire.
Phase I – Entering the Basin
Time to head to the new Biome! It’s lush, green, beautiful and deadly. Also be prepared to drown… a lot. While many aspects of the water system are visually beautiful, and building with water is the best I’ve seen in any game, many of the quest puzzles are frustrating and difficult to learn. But it’s all worth it! Let’s start this crazy adventure!
- Make 132 Wood Planks and 44 Iron Bars. Store them in your chests.
- Craft a Flame Altar and keep it in your inventory.
- Fly to the new quest Emerald Shores and Sanguine Seas from the Albaneve Summit Spire!
- The Quest updates with you arrive at the Passage to the Veilwater Basin. Jump down into the big hole and head westward through the cave!
- When you arrive at Riverreach, mark Obtaining a Mill.
- Enter and go into the Mill on your right. Kill everything. Go to the very top to find a Golden Chest. Then go down under the mill and you’ll see the stone, but we can’t grab it yet. Follow the path down and and outside. You’ll see three buttons that control the water valves. Kill the mobs and press them to stop the water flow.
- Go back and take the Improved Millstone!
- Exit the mill and Riverreach. Head Northwest to continue the original quest. I leap off the top off the mill and fly to the fossilized dragon head and Ol’ Captain’s Rest.
- You’ll see the soul of the Captain on the north end of the dock. Grab it!
- Welcome to the first attack from the Drak. Make short work of them!
- You’ll want to kill every Drak you see because we need the materials to make a Drak Soulward Flask at the Alchemist, which allows you to read their language and is required to complete quests. One flask lasts 45 minutes and takes:
- 10 Drak Scales
- 10 Drak Teeth
- 10 Drak Claws
- 10 Drak Blood
- Once you can craft a flask, do not take it until we’re ready. Because if you die, you lose the effects.
- Read the book on the bed under the dragon.
- Fly and use your Updraft to enter the town of Driftwood Wake.
- Read the two notes on the Billboard.
- Go inside the Tavern and read the note. Go to the upper level of the building across from the tavern and read the other note.
- You’ll find Ginger plants in the Northeast farm fields. Grab ’em!
- This is where I place my Flame Altar. Put it down, and teleport back to your base!
- You should have Crab Meat on your character. If not, quickly go back and find a crab, kill it, and teleport back to base. Keep the Crab Meat on your character. Do not deposit it into a container.
- Craft a bed, and summon Captain Fontane, also known as the Fisher. Take his quests then take all the others.
- One of the quests should be Inspiration for a Seafood Grill from the Farmer.
- You probably also unlocked Enormous Magic Chests from the Carpenter. These are the largest endgame chests, and we’ll want to craft these as soon as possible.
- Put the Millstone somewhere on the floor.
- Craft the Seafood Grill. You should see Grilled Lakehopper and Grilled Shimmerfin appear. Note these increase our Maximum Oxygen levels, which makes a huge difference for upcoming quests. No need to craft them just yet. Our Beef Stew is better than Grilled Crab Meat.
- Repair. Make sure you have at least 200 arrows, health potions and food. Get all quests.
- Teleport back to your Altar in Driftwood Lake.
- Mark Vengeance as your active quest and make your way there. Cut down a few Palm Trees to get Palm Wood Logs. You’ll probably also get some Bananas.
- You’ll come across Winter’s Brew Farm. Delicious Coffee Beans are growing in their garden! Harvest that Coffee! Remember this place a well, as we’ll be returning. Don’t cut them down. The beans regenerate over time.
- To the west is an Elixir Well. Dive down and let’s clear it out! To get to the root, you need to go to the bottom and climb up a wall. That’ll lead you to it. Note there’s a nasty Fell Sicklescythe at the root. Careful!
- Once the root is down, climb up and continue towards the quest. A path will lead you out to the west before it turns north. Feel free to grab a bunch of Shroud Slime from the glowing pink masses during your journey. Make sure you get 40 Pink Mushroom Meat. Don’t cut the trees down. Stead, farm those little mushroom things as you run along.
- Once you’re out of the shroud and running towards the quest Vengeance, if you haven’t already, you’ll come across banana trees. Cut them down to get some delicious fruit!
- When you arrive, you won’t be able to read the plaque, but you can kill the Drak. Now mark A Tool for Underwater Mining and run to it. If you don’t have this quest, the Blacksmith back at your base should have it available by now. Go and it it, then continue to the quest.
- Enter Orville. Read the note in the middle. Note this town has a huge garden complete with rice! Grab everything! It also has a functional water outlet. Use it and watch the rice field fill with water. Great for those who want ideas on how to plan and build their own irrigation.
- Go to the new location for the quest.
- Swim out in the water to the ledge on your left. Run up a bit, then glide to the quest item. Kill the Drak and loot the Mining Sieve.
- Time to make our way to the Veilwater Basin Spire! You’ll pretty much be swimming most of the way there. The way in is on the Southwest side. Taking the bamboo scaffolding upwards puts you on the first level. If you end up underwater, go back up.
- When you arrive in the room with the multiple levers, turn on all of them that have a Gold Column above them. Three in total. The others need to be off.
- On the final level, you first have to stand on a button and shoot through a slit. The final button you need to press is deep in the water. The only way to make it without drowning is to hold shift and sprint swim the whole way. There’s bubbles at the very end and it’s rough. Below is a video on how to do all of this.
- Go back to your base. Get the quests from your buddies, including the pirate.
- Keep the Mining Sieve on your character in your hotbar somewhere. You’ll be using it quite a bit.
- Start making Ginger Seedlings.
- You’ve probably found enough Gold Ore off the Drak to make 20 Gold Bars. Go for it!
- We really need to upgrade or Flame Altar to Level 9, but it’s going to take a bit of time. We can’t get the Swim Fins or the Diving Helmet until then.
- If you can make the Drak Soulward Flask at the Alchemist, do so. But don’t use it yet. If you don’t have the materials, you can either farm easier Drak at Driftwood Wake, where we put our Altar; or use the spire to fly north to Goldrock Saddle to farm what you need. Don’t start the next step until you can make the flask and have one on you.
- A quick note that I’m not a fan of the water drown trap garbage that’s all over the new beautiful zone. You’re probably going to die a lot to drowning and such before we get the swim fins and diving helmet. You can eat grilled fish to give yourself 10 more seconds of oxygen time, which can make all the difference, so I recommend grilling up some Shimmerfin, etc. and having it on you to eat when you’re ready to do underwater activities.
- Teleport to the Veilwater Basin Spire. Mark Finding Gold Coins and fly there.
- Swim under the temple from an entrance on the bottom east side and enter the inside chamber. Do not run to the gold. There’s traps! The item you want is underneath you. There’s also three buttons to press. Be very quick to loot the tablet, get back up, and then swim under and to the buttons. One of them is downward from the tunnels. When all buttons are pressed and the door opens, go into the above room and read the plaque. Use your pickaxe to dig into the stack of Gold Coins to reveal the Gold Chest. Open it for a new construction block.
- I recommend mining around 40 Gold Coins. They’re used to craft Fishing Bait, other fish-related items, and even specialty coffee recipes at the Fisher and Brewery, which we’ll get later.
- To open the final door shoot the button up top. You can see it from where you read the Drak Tablet.
- Mark Vengeance as your next quest, and fly on over! Enter the temple, swim down, loot the Gold Chest, come up and press the stone button on the wall. You can swim back down and into the hole to get another Drak tablet.
- Go outside and up top. Hydrak’Dal is the mini-boss you need to defeat. He has a ranged earthquake attack that hits pretty hard. Just kite him with Golden Steel Arrows. Once you get his head, you can focus on gathering materials to increase your Altar Flame to level 9.
- Teleport back to your base.
Phase II – Building a Mill and Upgrading our Altar
We’re going to prepare for making the strongest build in the game. A key component to this is the Gem of Currents, which will drop as you adventure through the Basin. Hold on to it, because it acts as the catalyst for our build’s crazy endgame damage. Also be on the lookout for Shock bows. Temple Keeper’s Bow and the Drak Whistle Bow are what you want. Even if you find a purple version, keep it. Note the endgame version of our build comes to life around level 39. Once you get the Wet Dog passive with a Shock bow and Gem of Currents, you’re ready to soak yourself (tee hee), apply the debuff to all your enemies, and destroy the endgame.
In order to unlock everything available in the new biome, we need to prioritize our altar upgrade. It’s going to take time, but the good news is we can have fun and expand our base while we do it.
- The materials we need to upgrade our Flame Altar are:
- 60 Sparks
- 60 Gold Ore
- 60 Green Vitriol Dust
- 60 Water
- 24 Iron Dust
- 36 Sulfur
- 30 Passionflower
- 60 Aquamarine
- 30 Pearl
- 1 Hydrak’Dal Head
- Let’s talk about making the Iron Dust. 1 Iron Dust takes 8 minutes. That’s 3.2 hours to make 24. The good news is we can make more Mills. Not just for Iron Dust, but for Gold Dust as well.
- Pick up that Improved Millstone. We’re going to make 4 Mills at the Alchemist, which requires:
- 120 Wood Planks
- 80 Stone
- 40 Lump of Clay
- 40 Iron Bars
- 3 Improved Millstone
- 90 Shell Limestone
- 45 Flintstone
- An hour and a half is fine because there’s plenty of exploring and farming to do while our mills chew up that Iron Ore for us. Fill 2 Mills with 12 Iron Bars in each! Iron Dust will also unlock Exploding Arrow III. I still use Exploding Arrow I because of the cascading explosions and stunlock.
- If you need Shell Limestone, just dive off the north end of the Veilwater Basin Spire and land on the stone. Mine away!
- To get power to our Mills, we need just one Small Water Wheel and one Small Windmill Sails, which will take:
- 12 Wood Planks
- 23 Tropical Wood
- 4 Iron Bars
- 8 Fabric
- Here’s the fun part. You don’t need water or to even have the wheel near your mills for them to generate power. Anywhere outside next to a floor panel works fine. Put down the Water Wheel and then attach the Windmill Sails to it and voila! Your mills now both have power.
- Make sure you’re rested, repaired, and have healing potions! Building the Mills also unlocked new quests. Take them from the NPCs.
- If you haven’t already, start making Gold Bars. Just a single stack of 20 will be fine to start. Unfortunately, we need Gold Dust to make the new arrows. For now, Steel Arrows work fine, and you’ll find Golden Steel Arrows off Drak.
- When you craft your first Iron Dust, and if you’ve already gathered Shell Limestone, the Natural Water Dispenser unlocks at your Workbench. We’ll be using it later to make Rice Fields.
- Once you have your first stack of Gold Bars, make the new Gilded Axe and Gilded Pickaxe.
- Let’s go get Aquamarine, Passionflower and Pearls!
- Teleport to the Veilwater Basin Spire.
- Fly to the Ancient Obelisk to the northeast. Read it.
- You’ll see a Gold Vein just to the northwest of the Obelisk, partially in and out of the water. Use your Mining Sieve to mine it underwater.
- The vein of Aquamarine is just north of the Obelisk on the shore. It’s bluish. There’s not much, but that’s alright. When we read the Obelisk, it revealed a Flame Shrine to the northeast. Teleport back to the Spire and then fly towards to shrine just north of Shipwrecks. Climb up to it and get your spark.
- You’ll be able to see the entrance to the Aquamarine Mine in the distance from the road down below the shrine to the south while looking north. Head in, grab the Color Dyes, and start mining away!
- Collecting Passionflower is probably the toughest part because it’s only available at night, and can be found throughout the region on the ground. Every time night arrives, make sure you go out hunting for it.
- You’ll probably need to mine more Coal and Iron Ore as well.
- Make sure you have a Flame Altar in your inventory.
- Time to go get some Pearls! As mentioned, Drak can drop them. But if you also want to go diving for them, we can farm the large Clamshells that are around Mother of Pearl deposits underwater. Sadly, there are very few deposits, and they’re a pain to get to. The first patch is close to the spire, but the second is in Starfish Shores to the North, but it’s surrounded by red Shroud we can’t pass through because we haven’t upgraded our Flame yet. So we have to go around the red shroud. The way around is Northeast of Goldrock Saddle, the town to the north of the spire. It’ll take you through Drak’Dal Camp. Once you come out of the east side, head to the Flame Shrine just northwest of the camp. You’ll cross a bridge and come upon a save point. We can’t go up to the shrine because of the red shroud, so we’ll take the road north of the save point. The below map shows where to go, put your altar, and the location of the clam spawn. Sadly, the respawn time for Clams is two hours. But if you combine Drak farming with the Clamshells, you can easily get the 30 you need in less than half of that time.
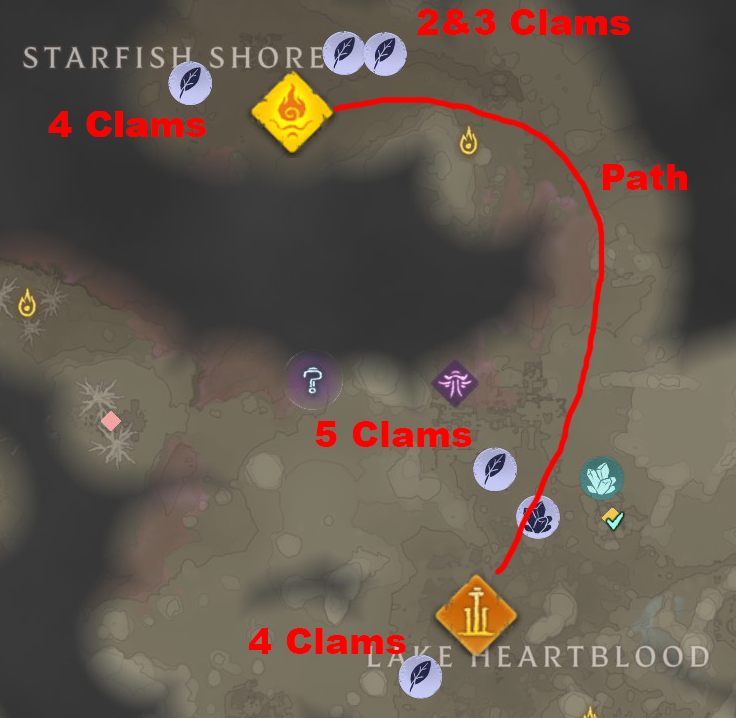
- A few places to farm Drak are Goldrock Saddle, north of the spire, Orville, east of the spire, Driftwood Wake, and the Drak’dal Camp northeast of Goldrock. Note that Goldrock and the Drak’dal camp have higher level enemies, so if you want easier targets, focus on Orville and other locations to the east and south. Also note that the Drak’dal Camp has a Golden Chest hidden in the stack of coins in the arena, and also the Circlet of Lightning, which is a must have for lightning mages.
- Remember when farming Drak locations to destroy all the wicker baskets. They drop goodies you need for your next armor set!
- Orville has a big garden area complete with Corn, Rice, Ginger, Tomato, Forest Beet, Strawberry, Saffron, Wolfsbane, and Sugarcane. This is where you can get loot Rice Seedlings. We’ll have to build irrigation to grow them, but grab them for now.
- Leveling your Flame Altar to 9 allows the real fun to begin! It’s also currently the highest level available, and will allow access to nearly all of the previously deadly shroud areas.
Phase III – Swinfins, Diving Helmet, and New Armor
I recommend leveling your Altar before proceeding with the guide. Now it’s time to get the two items that make all the difference in easily navigating underwater areas.
- Take the Diving Gear quest from the Hunter.
- There’s so much to do! Gather materials for our new gear, plan out and build a rice field with irrigation, get our diving gear, and more skill points! Make sure you have arrows, are repaired, have food, health potions and are ready for adventure!
- First, we’re going to get the Swimfins. Make sure you have Lockpicks. You might have the quest Born Swimmer, but if not, don’t worry.
- Fly to the town to the north on the shore of Goldrock Saddle and enter through the main gate. Go to the right and down. Keep going down until you enter the shroud and the red square room. Use Exploding Arrows on the glowing mound from the hallway. The fins are in the Golden Chest behind the gate in the shroud.
- Go back to base and craft a Diver’s Endurance Flask at the Alchemist.
- By this time you should have switched to Golden Steel Arrows. Of course you’ll use your Eternal Frost Arrow II whenever you can, but those golden arrows utterly destroy enemies.
- First we’re going to get the Diving Helmet. Like the temple where you probably drowned a bunch of times trying to press the buttons… well, it’s going to happen again. To get the item that improves underwater duration, you have to… deal with not having enough duration. Mark the Diving Gear quest and teleport to your Starfish Shore Altar.
- Make sure you’ve made some Grilled Lakehopper or Grilled Shimmerfin. That +10 Maximum Oxygen can make all the difference. If you want, you can even go for some Sushi or additional Oxygen-rich food. You can find the list here.
- Also have a Diver’s Endurance Flask ready to go.
- Going in blind, this quest is pretty much impossible to complete without dying. A lot. It’s not fun, it has to be executed perfectly, and it’s designed to try…try…try…try…and lots of die… again. Well screw that. This video tells you exactly how to do it with just the flask and fins. And with the extra Oxygen from the Grilled Fish, you should be good!
- Once you get the Diving Helmet, teleport back to base. Thank god that’s over with.
- I put the Helmet and Fins in my 7 and 8 slots on my first bar so I can quickly switch between them. We go underwater so often in this area you’ll be switching on the fly many times.
- Let’s go do the Gathering Capybara Bristles quest. Go to the farmer and craft Capybara Bait. Let’s go and get two of those fuzzy little cuties!
- Teleport to the Veilwater Basin Spire. You can go to the quest location, but if you fly North onto the secluded beach south of town, you’ll see a whole gaggle of Capybara. Get your two little buddies! Go back to base, make two Farm Animal Pillows, Capybara Feeders, and fill them up.
- By this time we can craft Enormous Magic Chests. If you’re a hoarder like most everyone is, a few of these go a long ways!
- Our next Armor set is level 43. It should be unlocked by now. We’re going with the Sunpiercer Chest from the Blacksmith, and the Quetzal Hunter Helmet, Skull Stalker Pants, and Skull Stalker Shoes from the Hunter. We aren’t crafting gloves because we’re getting the unique Frozen Gauntlets.
- To craft our new armor, we’ll need the following materials:
- 2 Aquamarine
- 11 Capybara Bristles
- 5 Palm Leaves
- 1 Chitin Poweder
- 14 Green Vitriol Dust
- 5 Water Reptile Leather
- 2 Gold Bars
- 1 Burst Fell Heart
- 100 Pink Mushroom Meat
- 1 Corrupt Boar Tusk
- 2 Piscine Ivory Dust
- 1 Shroud Sludge
- Get to work! You have juicy armor to make!
- Fish Bone and Fish Teeth can be found in Drak Camp containers, and are ground up to make Piscine Ivory Dust. Start breaking them apart and you’ll get what you need. The Cursed Shroud Sack drops off the red hostile plants. Gleam Root Dust comes from Gleam Roots, which are the glowing spiral looking things found on the shores at night. The Bursting Fell Heart comes from the high level Fell Sporeheads in the shroud. Shroud Gelatin comes form the Shroud Depth dwellers, or the floating Jellyfish. You should have plenty of those.
- While item Hunting, I go to the Drak’Dal Temple northwest of the Spire and kill the boss. He drops the Underwater Grappling Hook. Climb up the ladder in the corner, get the gold chest and head on out!
- Mark the ??? in the shroud northwest of the spire and head in. You’ll encounter a Shroud Stalker. Get all of the Pink Mushroom Meat you need. Unlock the Gem Forge! Next we need to find the Level 40 Shroud Lair. Make sure you don’t run into the Deadly Shroud. You can mine a bunch of Shroud Slime from the glowing red goo.
- Next we’re going to do the Elixir Well just outside of Goldrock Saddle. You’ll need to swim down and push one button on each side underwater. Make sure you use your Diving Helmet and Swimfins. When the center door opens ensure you have plenty of Explosive Arrows because you’ll get mobbed the moment you destroy the root. Go up on the ledge and open the Golden Chest!
- By now you should have crafted the new armor set.
Phase IV – Soaked Combat, Fishing, Coffee & Lycanthropy!
Ready for some stinky seafood mixed with delicious hot mochas and shapeshifting for juicy survival? We got you covered.
- The Farmer should have given you the Seafood Grill quest. If you don’t have it, you need to go out and catch a single Sunscale fish, which unlocks Tomato Fish Soup. Once the quest is available, if you don’t already have the meat to turn in, head to Dragon Dream Lake. That’s the best place to farm the crabs. Good thing you already have an Altar there! Fly to the little island in the middle of the lake. There’s 3 crabs and another on the shore. That should give you what you need. Teleport back to base and turn in the quest!
- Select Nice Day for Fishing. Go to the Captain and craft an Excellent Fishing Rod, and also take Lucky Catch if you don’t already have it.
- First, head to the Lucky Catch location, which is east of your Starfish Shores altar. It has a bunch of the Giant Bees, and their stings are nasty. You want to go into the area surrounded by Daylillies. Once the bees are dead, dig with your pickaxe in the middle of the X in the sand. The Lucky Fishing Rod has a higher chance of catching gems and magical items, and can even fish up level 50 gems.
- Next, take the Fisherman’s Resolve Talent. It takes 5 skill points. This increases our fishing endurance by 30% and is currently the only way to grant more endurance. If you don’t have the points, go to your Altar and remove some to add it. You don’t want to do the next quest without the bonus.
- Here’s the thing about fishing. It’s all about the bait and rod. It doesn’t matter where you fish, except for the Nice Day for Fishing quest. Once that’s done, you could go into Springlands and still catch the highest level fish and items with the lucky rod. Just find your favorite spot and make it happen!
- And the most important thing. Don’t watch the fish. Only watch the bar. When the fish first bites and you hook it and pull the opposite direction it starts to swim, only look at the red bar. The moment it stops moving, just switch direction. That’s the easiest and most efficient way to fish. When the red bar stops, go the other way and click when the section is complete.
- You should already have some Frogs in your stash. If not, it’s fine because we’re going to Fishing Island, which is southwest of the Veilwater Basin Spire. There’s a ton of Frogs hopping around there.
- Stand on the dock and start fishing.
- An Epic Fish is a Purple fish. When you catch one, teleport back to your base and have it on your character to turn it in. A purple fish in the stash doesn’t count.
- Now you can craft Epic Fishing Bait!
- If you haven’t changed your food now, our Meat will be either Grilled Crab Meat at the Seafood Grill, or Epic Crab Cakes at the Farmer. You also want Pumpkin Soup for the ranged damage, and Fruit Bowl.
- Make sure you have a few Repair Kits on you and at least 200 Golden Steel Arrows and 100 Exploding Arrows.
- Let’s go to the nearest Shroud Lair in Veilwater Basin to get the Archaic Essence we need to socket our new juicy Gem! It’s just west of the Gem Forge west of Goldrock Saddle. Mark that area and fly on down! The lair entrance is below. Careful, the central large rooms are rough with spawners and tentacles. Get all the Essence you can before heading to the Gem Forge and socketing your Gem of Currents!
- By now, you should have the Wet Dog passive. Ready to have some real fun? Teleport back to your base and talk to the Blacksmith. Craft a Portable Water Pump and put it on your hotbar (I have it at my #5 slot).
- Teleport to the Starfish Shores Altar and fill that pump up!
- The way it works? Stand in front of any wall and use the pump to soak yourself. Now all of your bow damage will apply the soaked debuff to your targets (including AoE targets from Exploding Arrow) which results in extra damage.
- Time to get our Frost Gauntlets, which increases Critical Strike Chance against Soaked enemies by 25%.
- Make sure you have Frost Resistance food on you before we take steps to get our Frost Gauntlets. We can also grab the Gem of Lycanthropy, which is in a Night Sanctum. If it’s day, we’re going anyway because want to set up a Flame Altar. Craft one, and head to the location marked below. If you do the Sanctum remember it requires a Spark to get in, and you need to swim down under the ice to access it. But our main reason for being here is to get those amazing Frozen Gauntlets.

- The Frozen Gauntlets are Northeast of the Sanctum deep in the water on a body. The below video shows exactly where.
- Once you have those gauntlets, you’ll see your crit chance skyrocket. It’s a beautiful thing. Destroy those soaked enemies!
- While in the area, you can also do A Fellow Shepherd quest while you’re in the area. Enter the temple, go down and avoid the traps. There’s a Tablet in there. Grab it. There’s three buttons to press. The two are on the bottom, and the third is halfway up – you’ll see a grapple point and crawl upwards to a greener area (above the red). You’ll open a door and it’ll be there. Go back outside and up into the open door, kill Mr. Chonky and grab the soul!
- Teleport back to your base! Make sure you have plenty of arrows, fresh food, and at least one repair kit.
- See the Elixir Well west of Starfish Shores? Mark it, run on over, and pure the evil! When you get to the first lake, go right up the slope. No need to go in the water. Note there’s a Fell Sicklescythe near the root. At level 43 he packs a punch. There’s a Gold Chest on your way out – when you use the jumping pad make sure you glide or you’ll fall into the deadly shroud. Make sure you repair your bow before you go out. There’s a lot of baddies waiting for you if you didn’t clear them already.
- When you’re done, don’t teleport back yet! Repair your bow if necessary.
- It’s Coffee Time! Coffee Coffee Coffee! Select Coffee, The Greatest Good quest and head on over! You’ll run a ways through the shroud and come across Stillwater Bay. Apparently they have a Tentacle problem. There’s also a Fell Sicklescythe that’s not very friendly.
- Go into the locked door on your right and up to read a Black Coffee recipe. Go on to the bridge and attack the Sicklescythe from near the bridge wall and use it for cover while you shoot him down.
- Go into the building across the bridge and climb up and voila! Get the Coffee Drum Roaster and the Coffee Brewery.
- There’s two more recipes: Latte and Sweet Mocha, but it’s a bit hard to write out their location, so I’m including the video below to show how to get all of them.
- The tall plants that give Coffee Beans are pretty rare. The good news is we already went through Winter’s Brew Farm! Just Northwest of our Altar at Dragondream Lake. Teleport on over, go to the Farm and get your Coffee Beans!
- Get clear of the shroud and teleport back to base. Start roasting the Coffee Beans, and place Nameless One with a bed before taking his two quests.
- Time to knock out two Shroud Roots. Teleport back to base. Repair, get arrows, potions, etc.
- Teleport to the Dragondream Lake Altar.
- The first Root is to the south under Riverreach. The entrance is an underwater cave beneath the river waterfall at the very bottom.Wear your Divers Helm and Swimfins to get there.
- Teleport to the Dragondream Lake Altar.
- Go to the Flame Shrine to the north and get the sparks.
- Then go to A Glimpse of Eternity quest. A Glimpse of Eternity is a mage quest. You pickaxe your way down into the Hidden Tomb. If you want to do it to learn it for another build go for it. Read the book at the bottom of the tomb, and the quest shifts.
- Once that root is done, teleport back to your base and make a Drak Soulward Flask and use it.
- Teleport to the Veilwater Basin Spire and fly east to the Colorful Lights quest which is up the hill in the Drak’Dal Ruin. Go down inside and read the small tablet on the back of a column near the Silver Chest.
- Time to get that root! It’s in the shroud just to the north, northwest. Enter the shroud and follow the path downward. You’ll see the root off in the distance on the right. Terminate it!
- Teleport back to your base. Talk to the Carpenter and you can now make new lights!
- Put those Roasted Coffee Beans into a grinder if you haven’t already.
- One more root! Teleport back to your Altar at Lacemaker Pond and fly down the valley westward. Pass the Suspicious Drak’Dal Ruin, and start heading north. Your destination is the ? to the northeast, in the shroud. You’ll encounter a nasty Shroudstalker. Kill it with vengeance. Keep following the trail. The mobs are Level 45 here, so careful! The point is a Night Sanctum. You can run it if it’s night, or wait until later.
- The real reason we’re here is to destroy the Root. It’s west of the Sanctum on the other side of the shroud and in the northwest corner up a path.
- When the root is dead, teleport back to base. Repair and prepare for the toughest content yet!
Phase V – Cromwell
Ready for the toughest content you’ve had to deal with yet? We’re heading to Cromwell. The best gold chest farming area paired with the nastiest enemies, all of which are Level 45. The best food combination is: Sweet Mokka, Honey Baked Banana, Taro Root Curry, and Chicken Soup. Eat up!
- Time to go to Cromwell, which is the endgame farming location. Mark the quest Finding A Bard Assistant and make sure you have 400+ arrows, two repair kits, 10 lockpicks, food, and healing potions.
- Craft an Altar and have it in your inventory.
- We’re probably out of Altars to place, so we have to remove one. I recommend removing Lacemaker Pond. Teleport there and remove it.
- Teleport to your Starfish Shores Altar and head north!
- You’ll follow a path and see Shiitake Mushrooms in the Bamboo forest. Grab ’em!
- It’s a bit of a trek, but the path will lead you to Cromwell. Place your Altar by the Savepoint.
- Go in, climb up the ramparts and glide across to get into the chamber with the Monstrosity. When you kill it, the bard soul is to your right behind the locked door and in a cell.
- Make your way up, up, and up. You’ll figure out how to get to the Throne Room. There’s two buttons. One up on each side of the throne room. This will open the door and let you go behind the throne area and down to the Shroud Root. Don’t go into the room. Shoot the spawners and the Root with Exploding Arrows. There’s two Level 45 Shroud Stalkers in there. If you aggro both, you’ll probably die. Once the root and spawners are down, take care of the Stalkers.
- To my knowledge, there’s nothing more to do there. The back area goes down to the Shroud Lair. There is a gold chest down there, but it’s a bit of a task to get to.
- There’s one root left. It’s west of Cromwell by Smugger’s Hideout. Once you take that root out, you’re done!
- This is where the guide currently ends. There’s still many places to explore, quests to do, and items to farm, but the core of the expansion is now complete. I discuss what you can focus on from the point onward below.
PART IX – Endgame after Veilwater Basin
Congratulations! You’ve essentially completed the core of the game by this point. Here’s all the things you can continue to do:
- Explore the entire map
- Reach max Character Level (45)
- Max Weapon Gem Level (50)
- Build a grand base in Veilwater Basin
- Complete all quests
- Get cosmetic items
And of course, starting over with a completely different build. Melee is a blast, and playing a mage is very challenging yet rewarding at endgame. And you can start your new character in your existing world.
I hope you found this guide useful! If you have any recommended changes or enhancements, please leave a comment!
Ranger Build Skill Overview
The recommended build overview is presented as a floating panel in the upper right so the player can distribute points as they follow the build guide.
Ranger Skill Point Order
- (Warrior) CONSTITUTION [1]
- (Tank) CONSTITUTION [1]
- (Core) DOUBLE JUMP [4] (Optional)
- (Ranger) DEXTERITY [1]
- (Ranger) MARKSMAN [1]
- (Ranger) SNIPER [1]
- (Ranger) SKILL SHOT [1]
- (Ranger) BOW SPECIALIZATION [3]
- (Ranger) RANGER [2]
- (Healer) INTELLIGENCE [1]
- (Healer) HEALER [1]
- (Healer) BLINK [4]
- (Healer) SPIRIT [1]
- (Healer) WATER AURA [1]
- (Healer) INTELLIGENCE [1]
- (Healer) WATERS OF LIFE [2]
- (Ranger) MULTI-SHOT [4]
- (Ranger) MULTI-SHOT SPREAD [3]
- (Healer) EMERGENCY BLINK [2]
- (Assassin) DEXTERITY [1]
- (Assassin) AIRBORNE [1]
- (Assassin) UPDRAFT [4] (Optional)
- (Ranger) VITALITY SURGE [1]
- (Assassin) ENDURANCE [1]
- (Assassin) SNEAK ATTACK [3]
- (Assassin) BACKSTAB MASTERY [1]
- (Assassin) DEXTERITY [1]
- (Assassin) DAGGER SPECIALIZATION [3]
- (Assassin) VEILED VIGOR [2]
- (Assassin) ENDURANCE [1]
- (Assassin) SHELL SHOCK [3]
- (Assassin) EXPOSE WEAKNESS [4]
- (Assassin) GRACEFUL STRIDE [5]
- (Ranger) MULTI-SHOT TRIGGER [3]
- (Ranger) DEXTERITY [1]
- (Ranger) RICOCHETS [4]
- (Ranger) CHAIN-REACTION [5]
- (Survivor) ENDURANCE [1]
- (Survivor) RUNNER [1]
- (Survivor) KICK [3]
- (Survivor) ENDURANCE [1]
- (Survivor) SWIFTSHOT SUSTENANCE [1]
- (Survivor) DEXTERITY [1]
- (Survivor) DESSERT STOMACH [4]
- (Survivor) REBOUND (1-3) [2+2+2]
- (Ranger) FATAL PRECISION (1-3) [1+1+1]
- (Ranger) BLESSED ARROWS [1]
- (Ranger) SNIPER (2-3) [2+2]
- (Assassin) VEILED VIGOR (2-3) [2+2]
- (Ranger) BLESSED ARROWS (2-3) [1+1]
- (Trickster) COUNTERSTRIKE [1]
- (Healer) SHROUD FILTER [1]
- (Healer) SHROUD RESISTANCE [2]
- (Healer) SHROUD MISERY [2]
- (Battlemage) INTELLIGENCE [1]
- (Battlemage) EXALTED [5]
- (Battlemage) INTELLIGENCE [1]
- (Ranger) RANGER (2-3) [2+2]
- (Ranger) MARKSMAN (2-3) [1+1]
- (Assassin) BACKSTAB MASTERY (2-3) [1+1]
- (Assassin) AIRBORNE (2-3) [1+1]
- (Battlemage) LIFE ESSENCE (1-3) [2+2+2]
- (Assassin) SLICE AND DICE [3]
- Any CORE and SURVIVOR you want now
Warrior Build Skill Overview
The Warrior build slams, smacks, and becomes nearly unkillable once the life leech takes hold. The damage is also solid. It’s probably the “easiest” build in the game, because it’s the most forgiving. Want to jump in the middle of a dozen enemies and just start swinging away without worrying about dying? This build is for you!
Weapons: Frost Smasher, Ignited Hammer, Ignited Bow, Sword of Radiance (can use Gorestriker, Mace of Wrath)
Gems: Swiftness, Puncturing
- (Tank) CONSTITUTION [1]
- (Warrior) CONSTITUTION [1]
- (Core) DOUBLE JUMP [4] (Optional)
- (Core) MERCILESS ATTACK [2]
- (Core) POWER PERRY [1]
- (Warrior) WARRIOR’S PATH [1]
- (Warrior) ONE-HANDED SPECIALIZATION [3]
- (Warrior) STRENGTH [1]
- (Warrior) SLASHER [1]
- (Warrior) CONSTITUTION [1]
- (Warrior) VETERAN [2]
- (Warrior) BATTLE HEAL (1-3) [2+2+2]
- (Guardian) HEAVY PLATES [1]
- (Guardian) EVASION ATTACK [4]
- (Battlemage) ARCANE DEFLECTION [1]
- (Battlemage) BLINK [4]
- (Battlemage) EMERGENCY BLINK [2]
- (Trickster) COUNTERSTRIKE [1]
- (Trickster) INTELLIGENCE [1]
- (Trickster) BEGONE [3]
- (Guardian) SHINY PLATES [1]
- (Guardian) CONSTITUTION [1]
- (Guardian) TOWER [3]
- (Guardian) WARDEN [3]
- (Guardian) SOUL LEECH [2]
- (Guardian) STRENGTH [1]
- (Guardian) CONSTITUTION [1]
- (Guardian) THICK SKIN [5]
- (Guardian) EARTH AURA (1-3) [2+2+2]
- (Guardian) NEMESIS (1-3) [2+2+2]
- (Core) OPPORTUNITY [1]
- (Core) GROUNDING HOOK [4]
- (Survivor) ENDURANCE [1]
- (Survivor) RUNNER [1]
- (Survivor) ENDURANCE [1]
- (Survivor) GOOD METABOLISM [3]
- (Survivor) DEXTERITY [1]
- (Survivor) DESSERT STOMACH [4]
- (Survivor) REBOUND (1-3) [2+2+2]
- (Warrior) STRENGTH [1]
- (Warrior) BASH [1]
- (Warrior) BREACH [3]
- (Warrior) SHOCKWAVE [3]
- (Battlemage) INTELLIGENCE [1]
- (Battlemage) UNITY [1]
- (Battlemage) WAND SPECIALIZATION [3]
- (Battlemage) ARCANE PROLIFERATION [3]
- (Battlemage) LIFE ESSENCES [2]
- (Battlemage) EXALTED [5]
- (Battlemage) LIFE ESSENCES (2-3) [2+2]
- (Battlemage) INTELLIGENCE [1+1]
- (Healer) INTELLIGENCE [1]
- (Healer) HEALER [2]
- (Healer) WATER AURA [1]
- (Healer) INTELLIGENCE [1]
- (Healer) WATERS OF LIFE [2]
- (Warrior) VETERAN (2-3) [2+2]
- (Warrior) BASH (2-3) [2+2]
- (Core) POWER PARRY (2-3) [1+1]
- (Trickster) COUNTERSTRIKE (2-3) [1+1]
- (Guardian) CONSTITUTION [1+1]
- (Warrior) STRENGTH [1]
- (Assassin) DEXTERITY [1]
- (Assassin) AIRBORNE [1]
- (Assassin) UPDRAFT [4]
- (Assassin) AIRBORNE (2-3) [1+1]
- All remaining CORE and SURVIVOR nodes you want from here on out!